

Microsoft Sentinel Integration
Integrate TrapEye with Microsoft Sentinel via the Logs Ingestion API to forward threats and interactions in real-time - without syslog and Azure Monitor Agent (AMA) overhead.
The steps required to configure the Logs ingestion API are as follows:
- Create a Microsoft Entra application to authenticate against the API
- Create the Data Collection Endpoint to receive data (DCE)
- Create two custom tables in a Log Analytics Workspace to store TrapEye threats and interactions events
- Configure the Sentinel connector in TrapEye
- Test the log flow by sending sample events from TrapEye to Sentinel
Create Microsoft Entra application
Section titled “Create Microsoft Entra application”On the Microsoft Entra ID menu in the Azure portal, select App registrations > New registration.
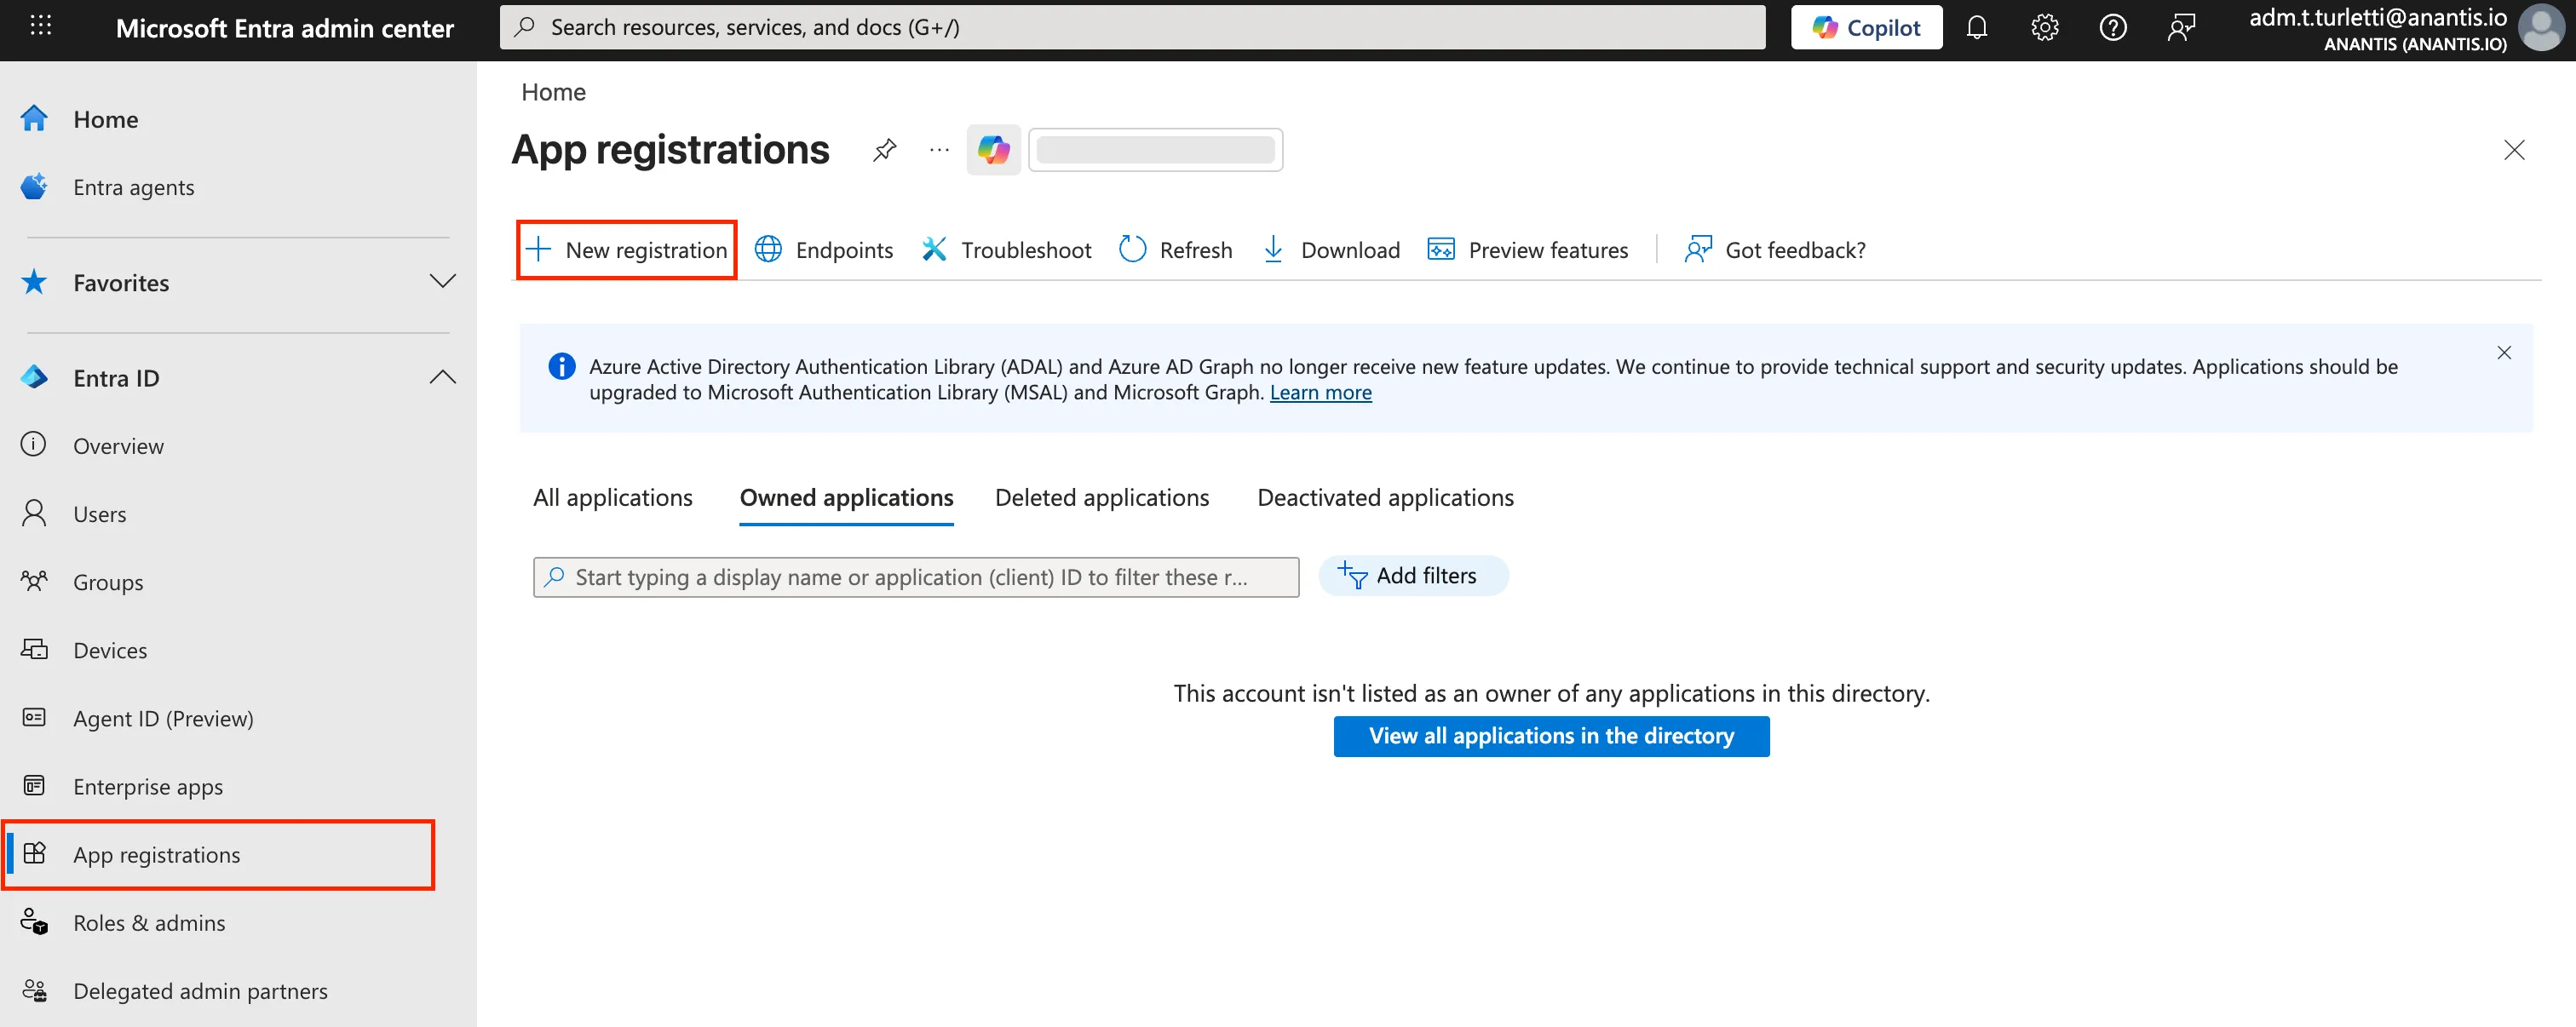
Choose a
Namefor your application. The Redirect URI is not needed for this integration.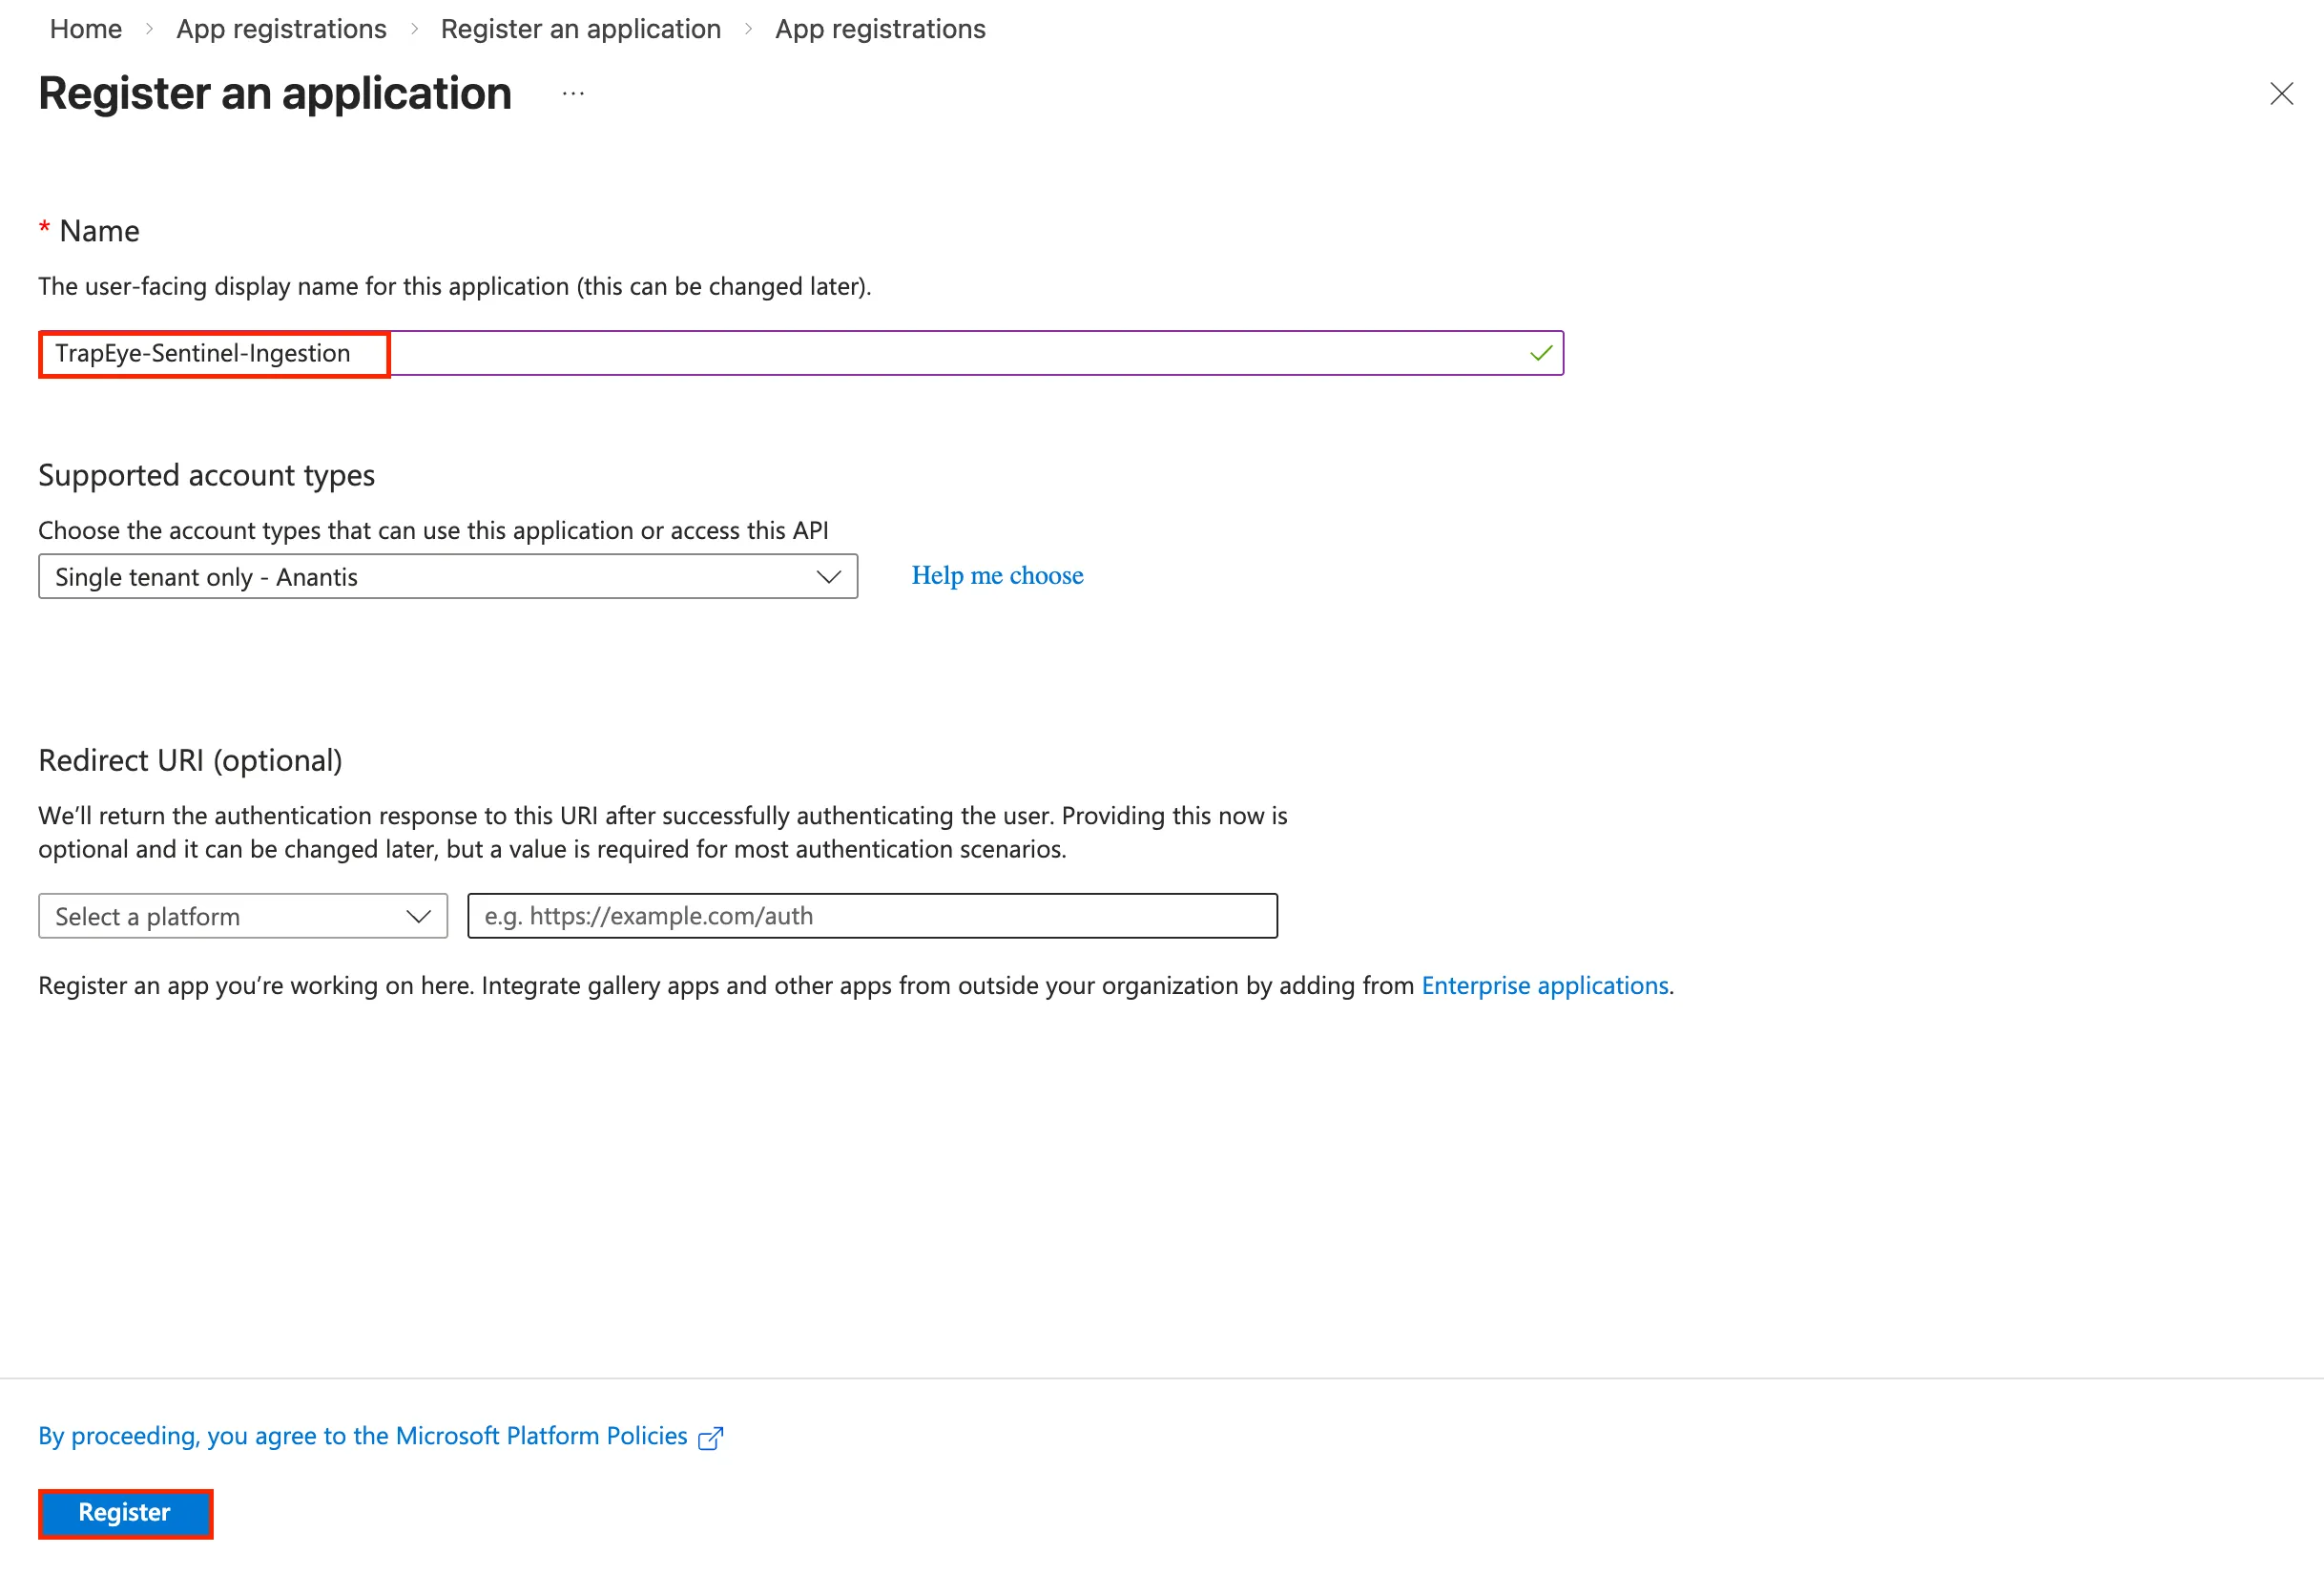
Then click Register to create the application.
In the Overview section, you can view the details of the application.
Note the
Application (client) IDand theDirectory (tenant) ID. You will need these values later.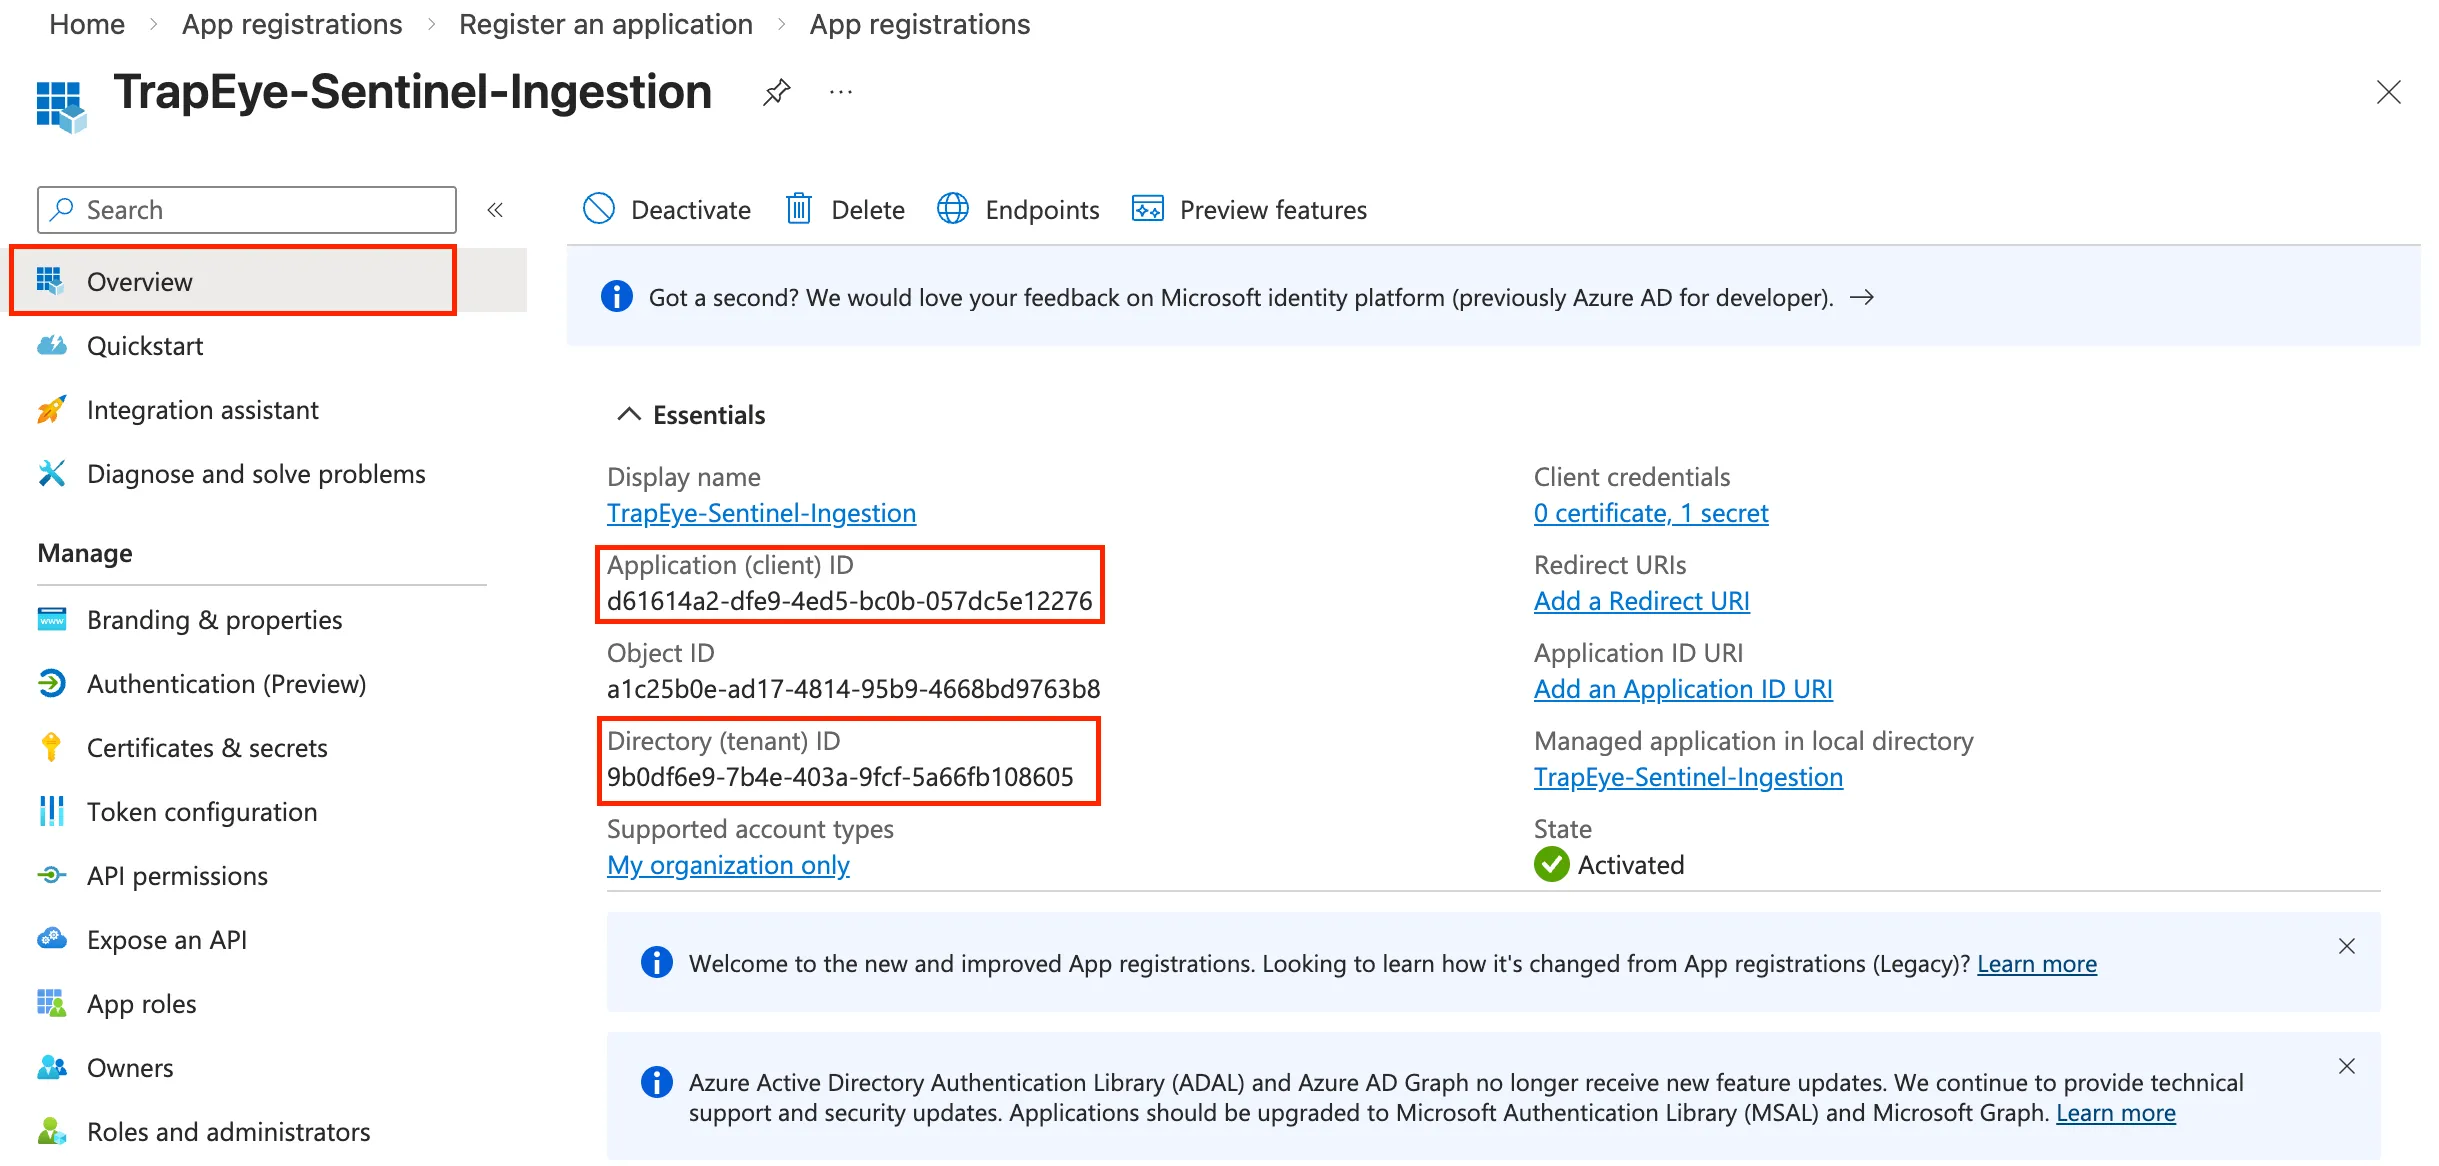
Select Certificates & secrets > New client secret. Give the secret a name to identify its purpose and select an Expires duration.
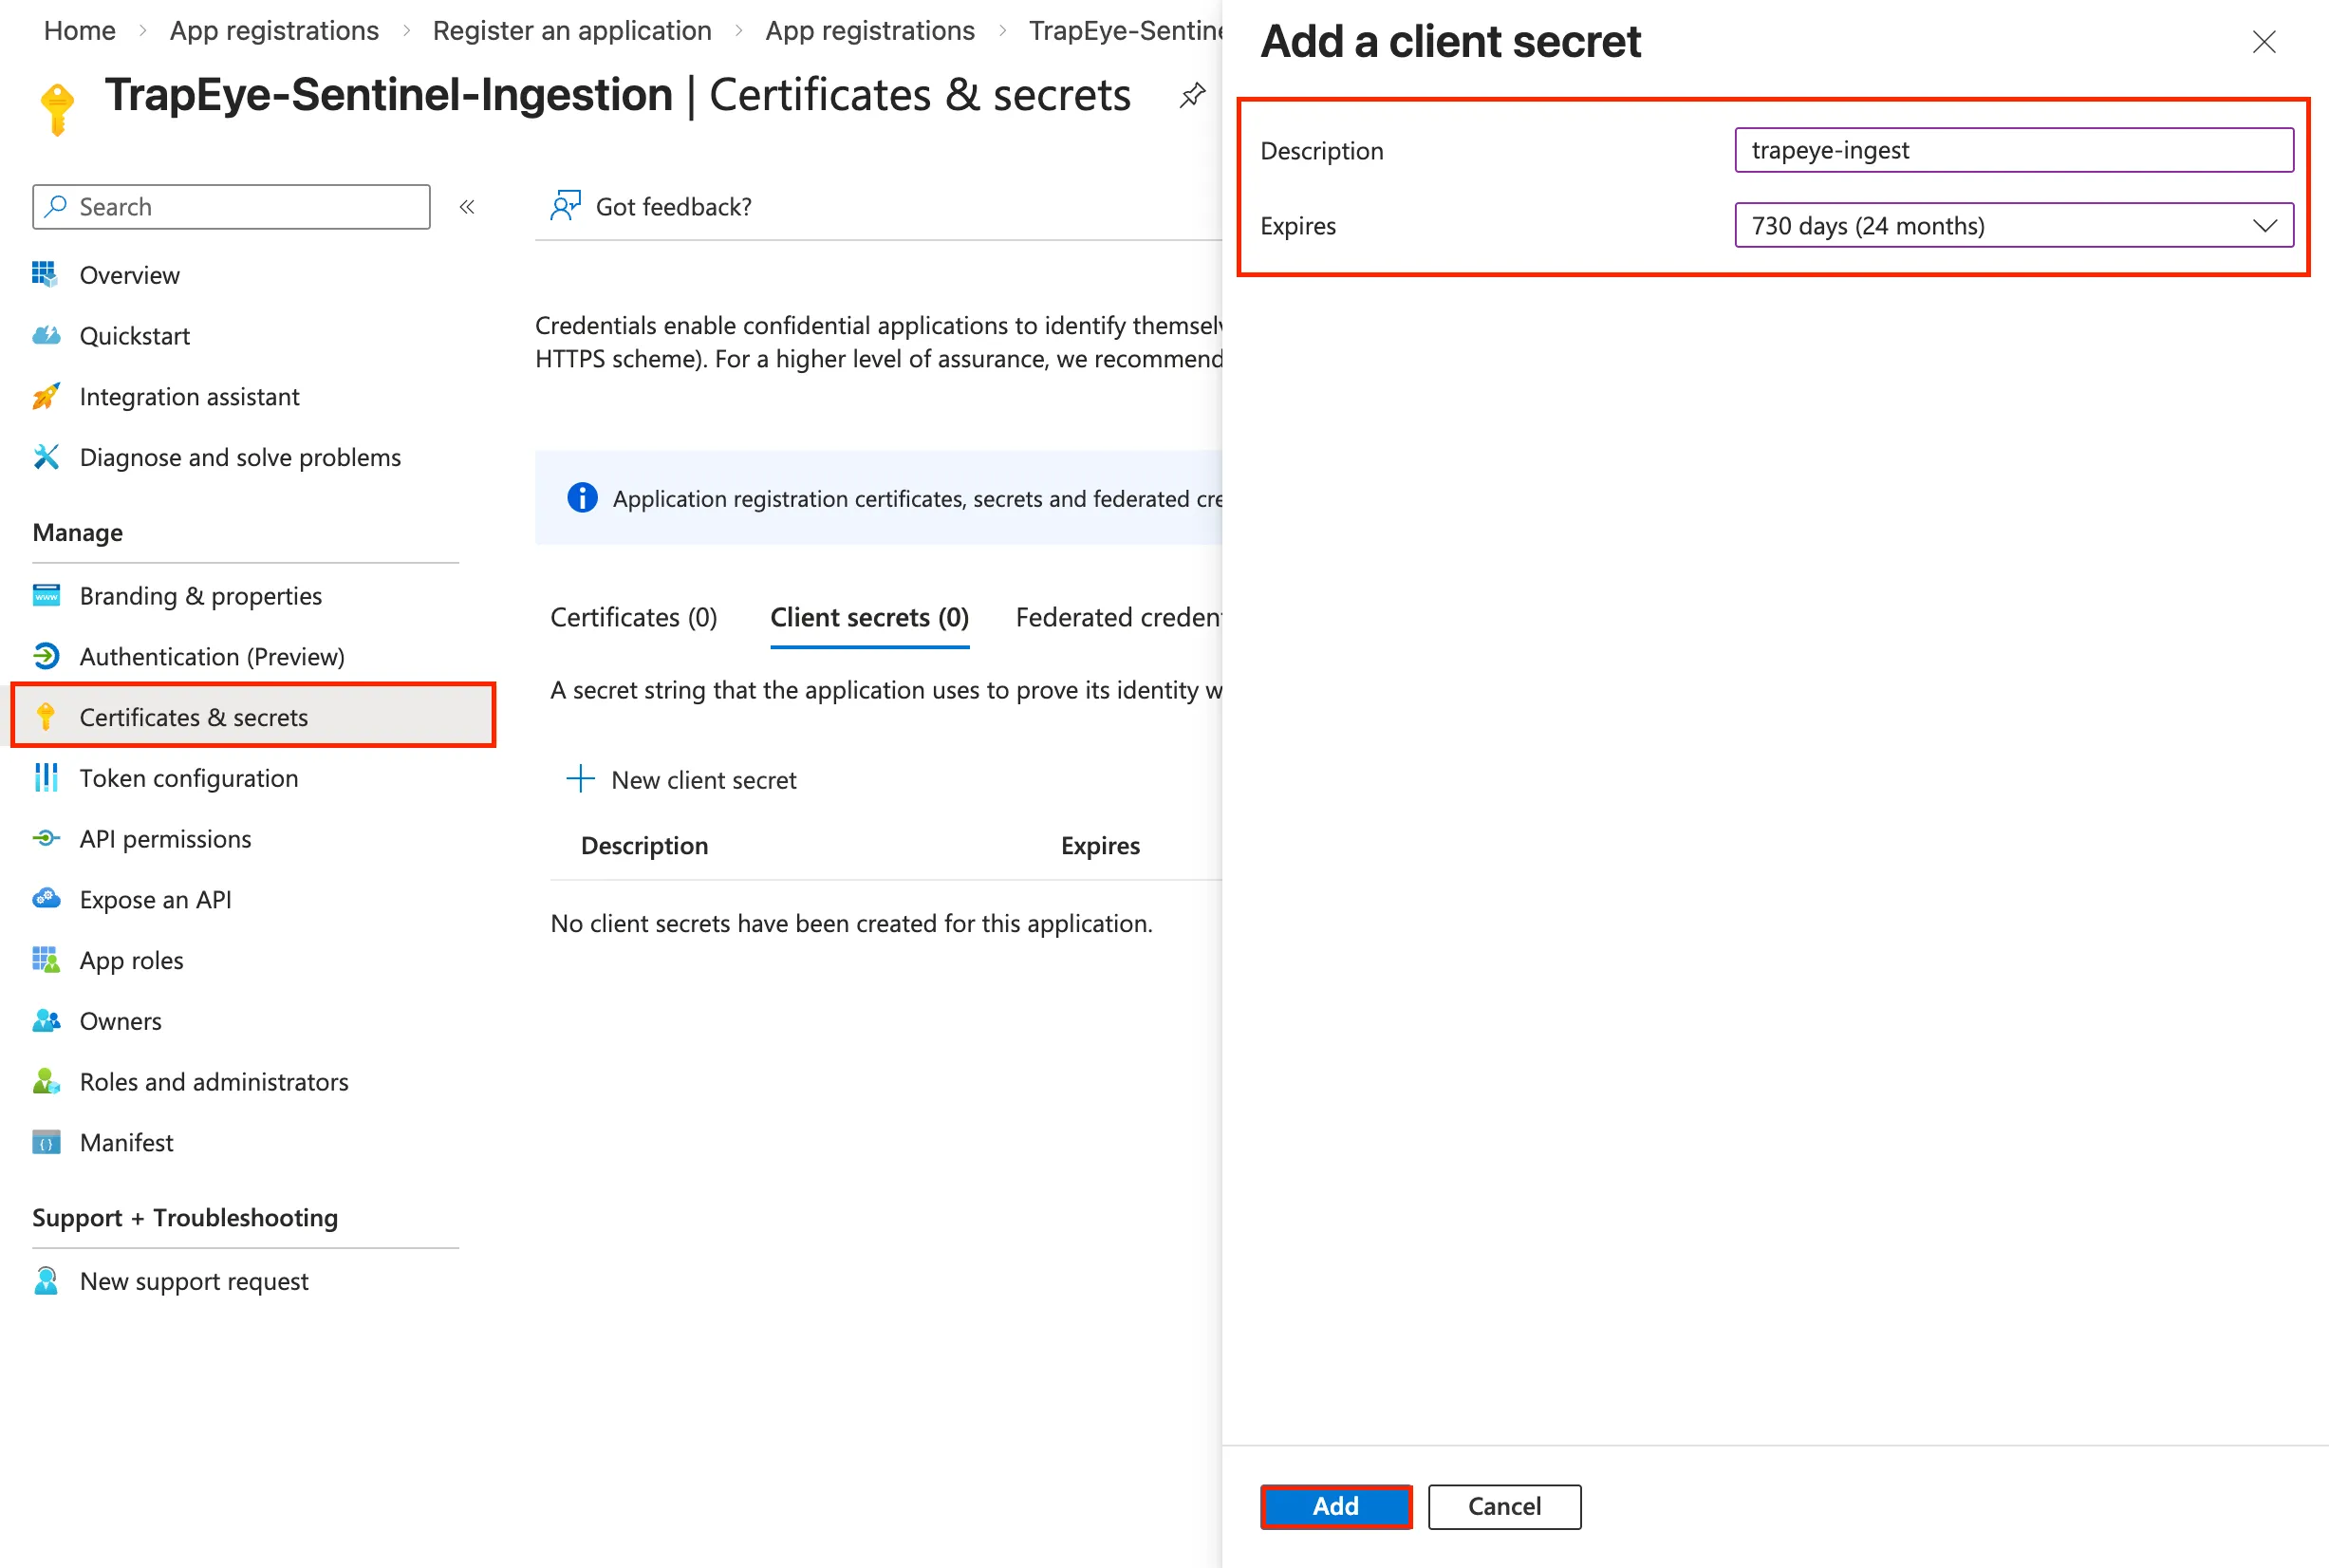
Copy the generated secret
Valueimmediately, it will no longer be visible once you navigate away from this page.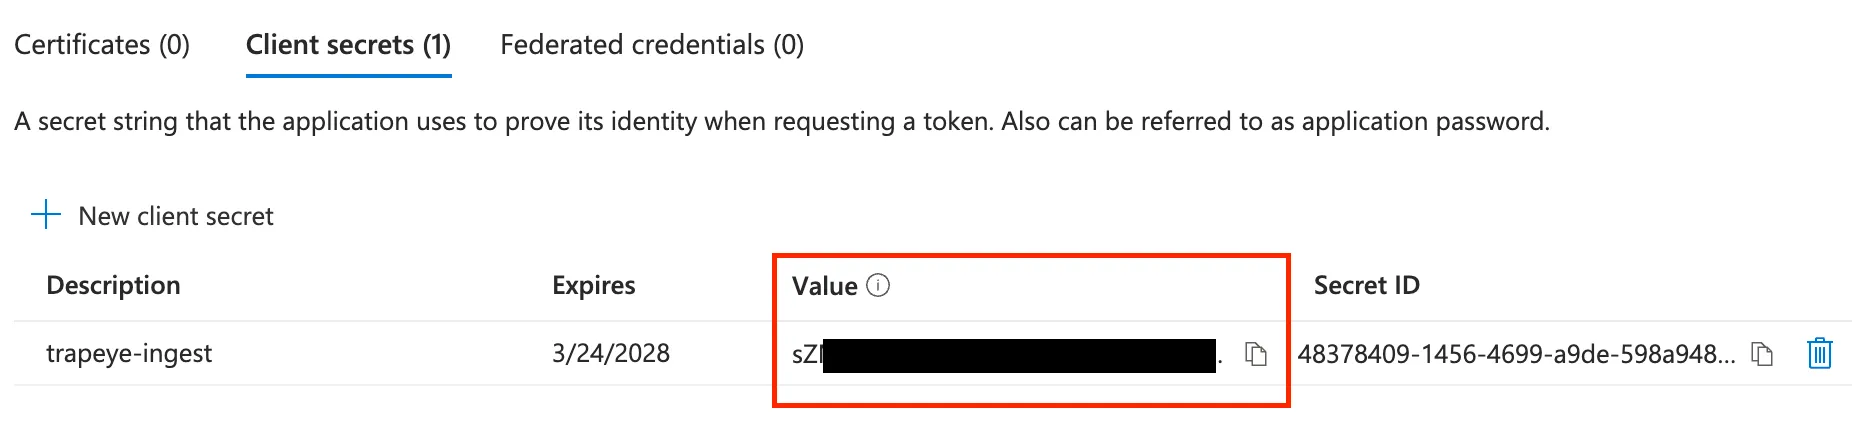
Create Data Collection Endpoint (DCE)
Section titled “Create Data Collection Endpoint (DCE)”A Data Collection Endpoint is required to ingest logs via HTTP. After you configure the DCE and link it to a Data Collection Rule (DCR), you will be able to receive events in real-time.
In the Azure Portal, navigate to Subscriptions > Resource providers and verify that
Microsoft.Insightsis registered. If not registered, select it and click on Register.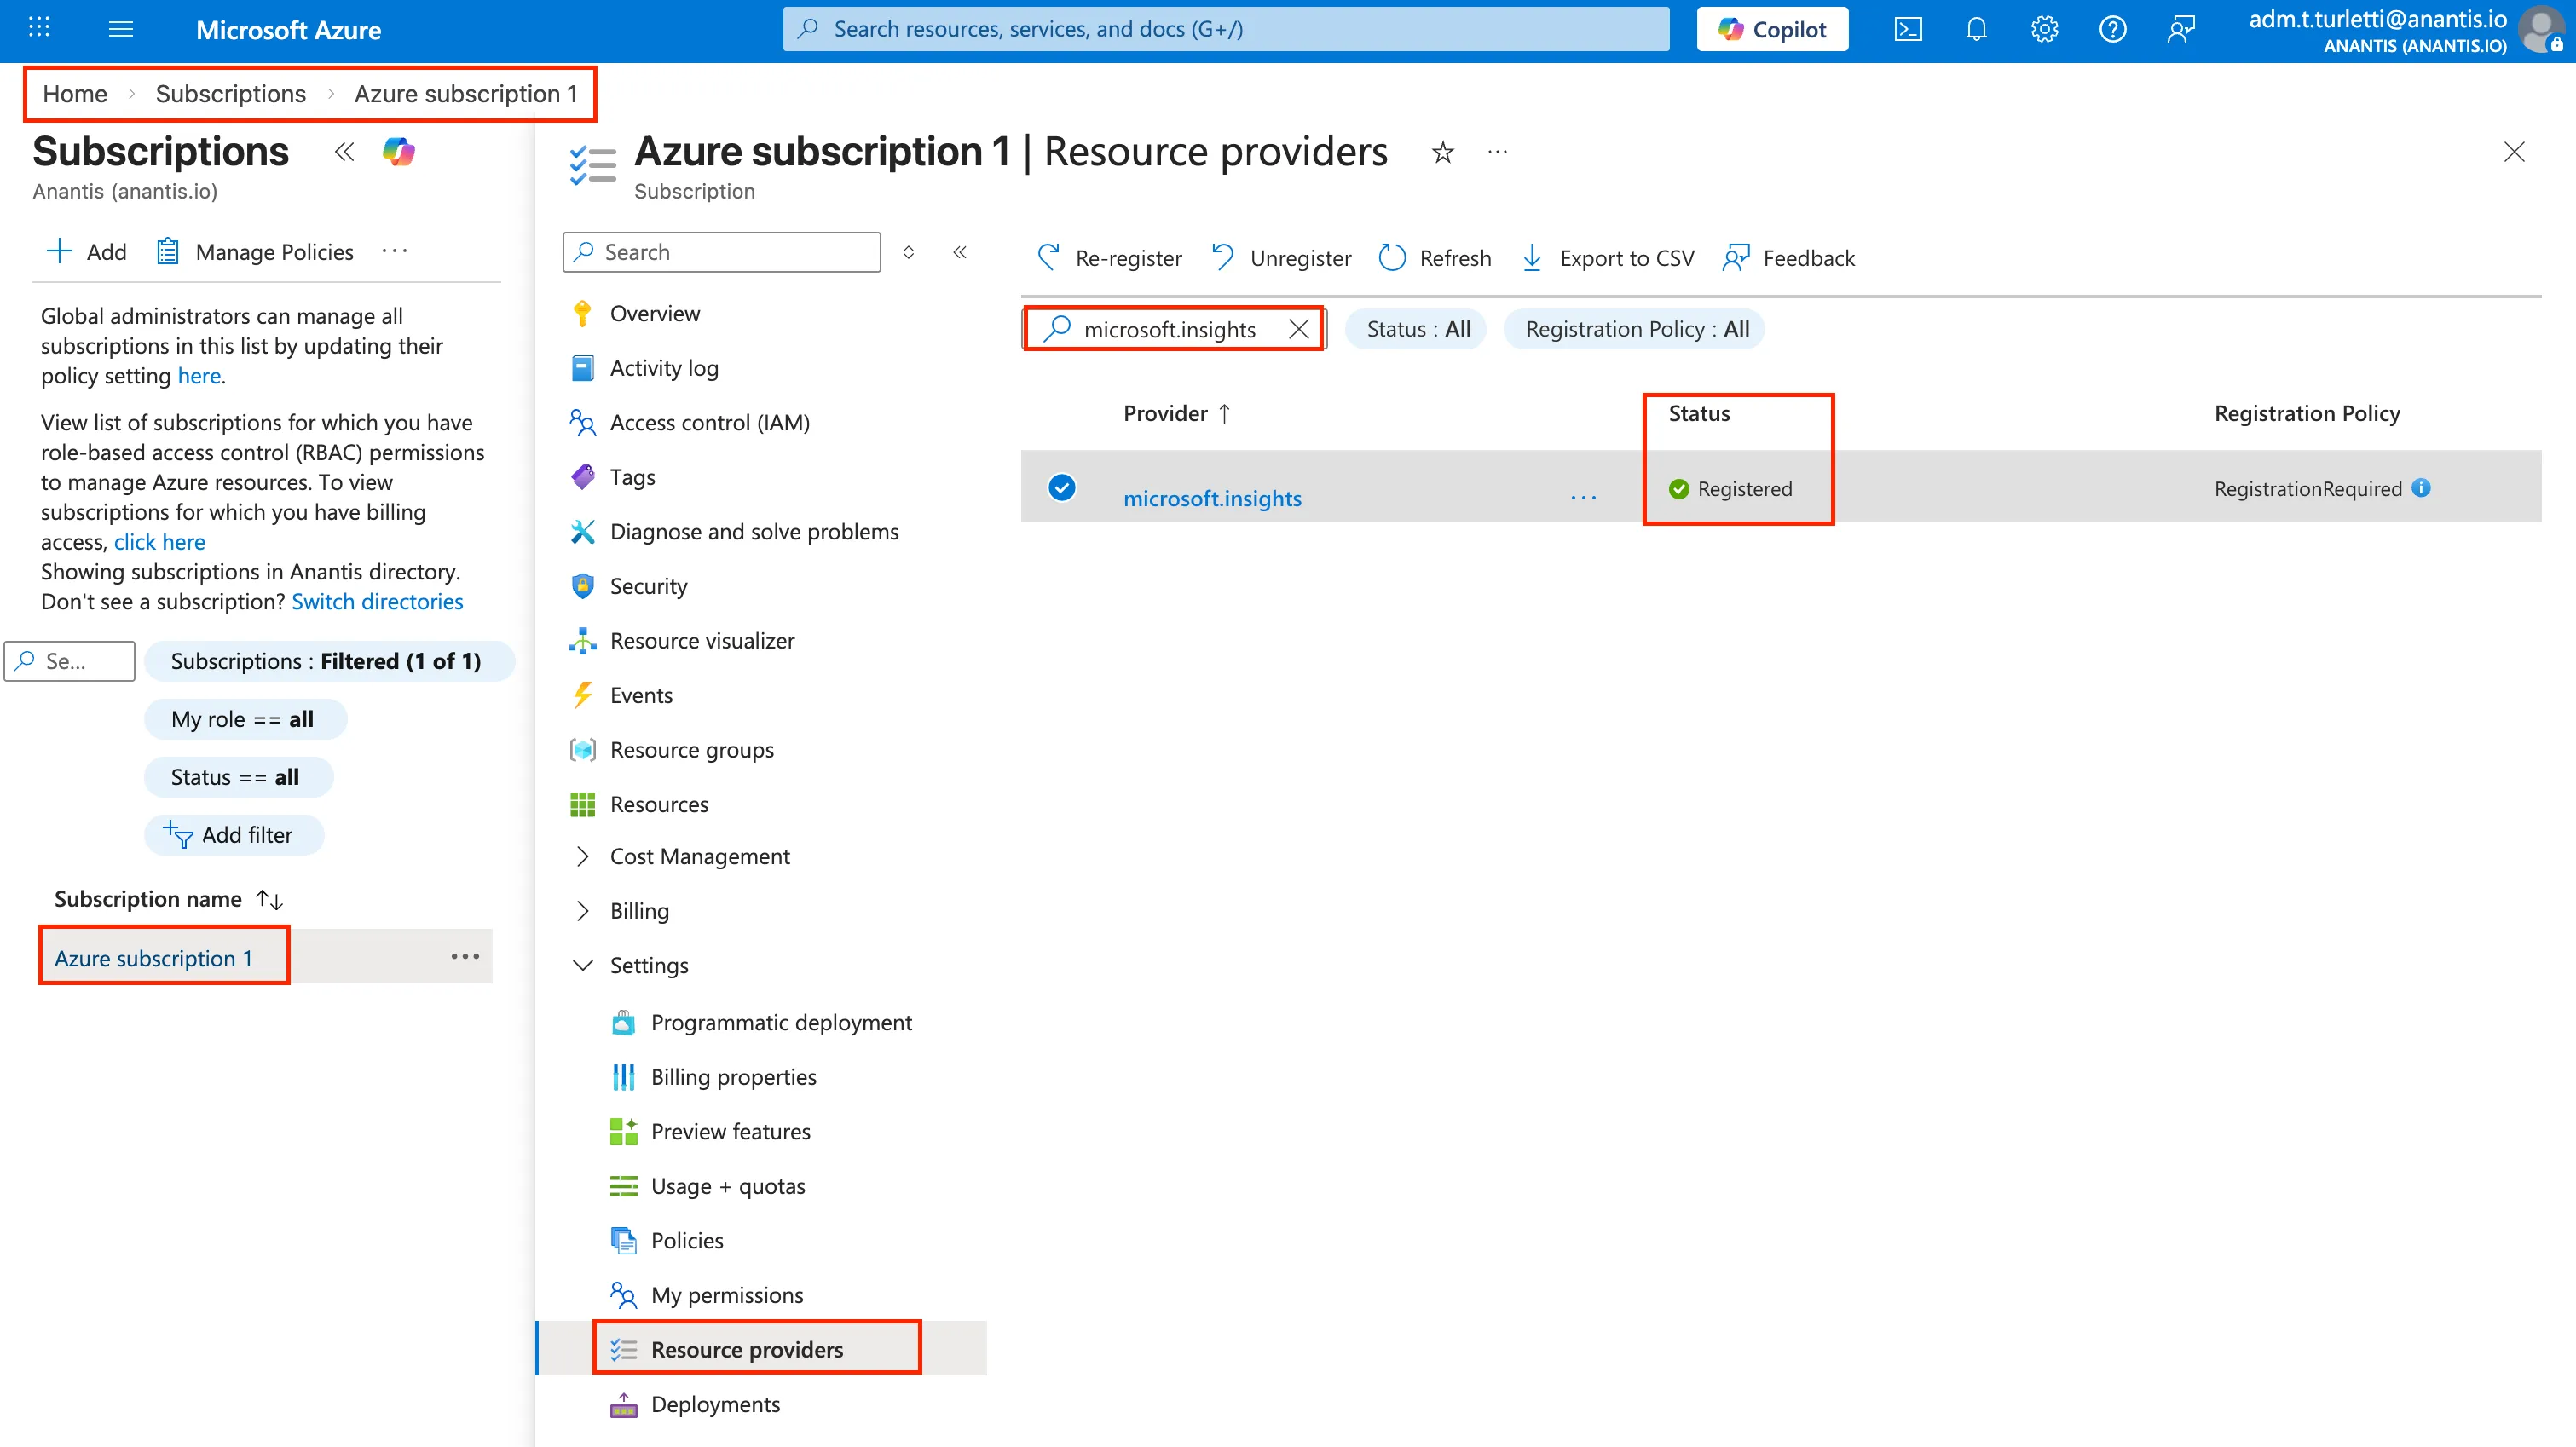
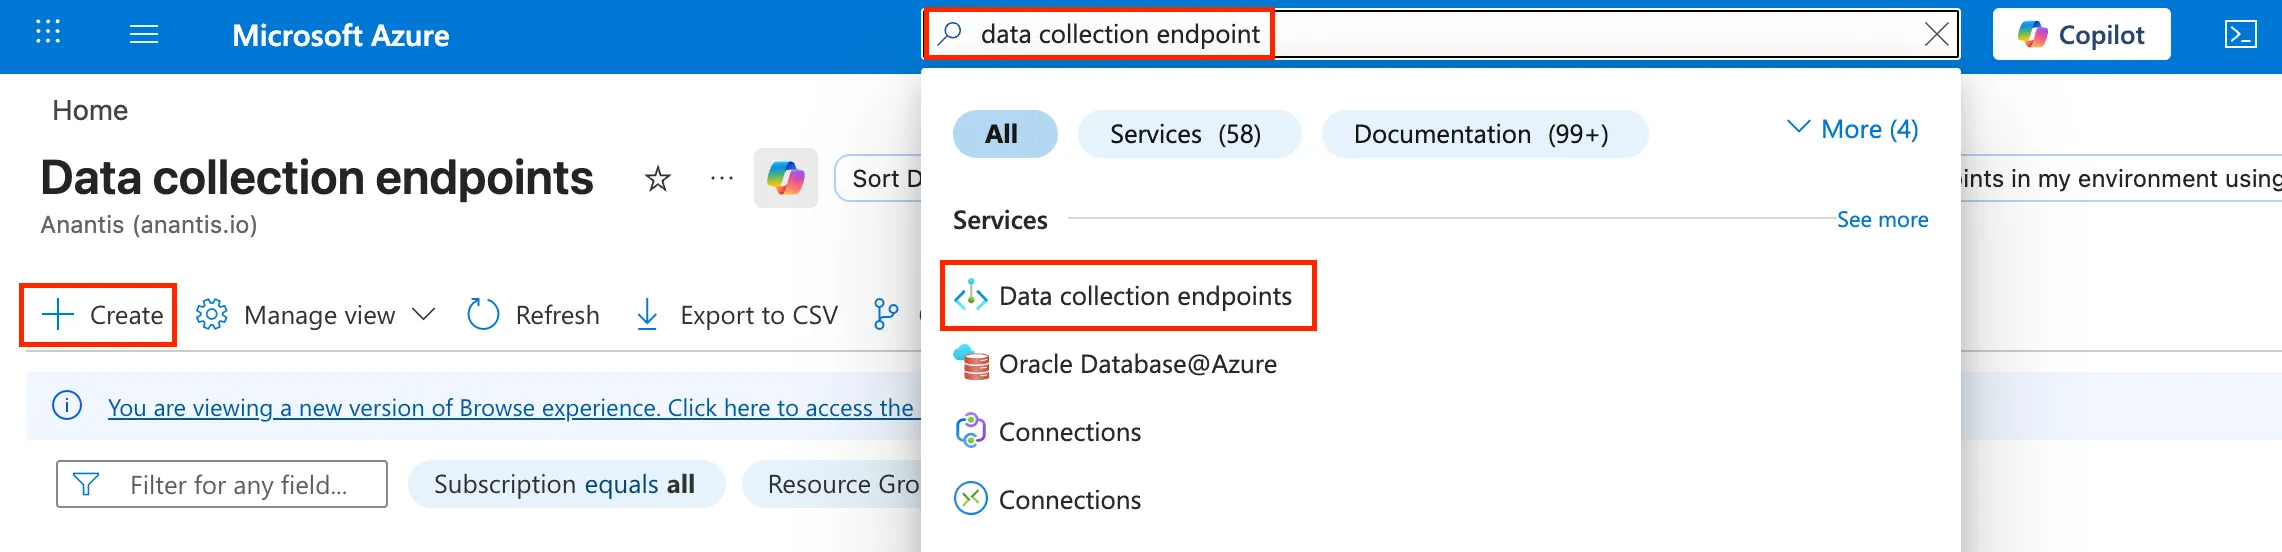
Navigate to Azure Monitor > Data Collection Endpoints and click on Create.
Specify an
Endpoint Name, aResource Groupand aRegion.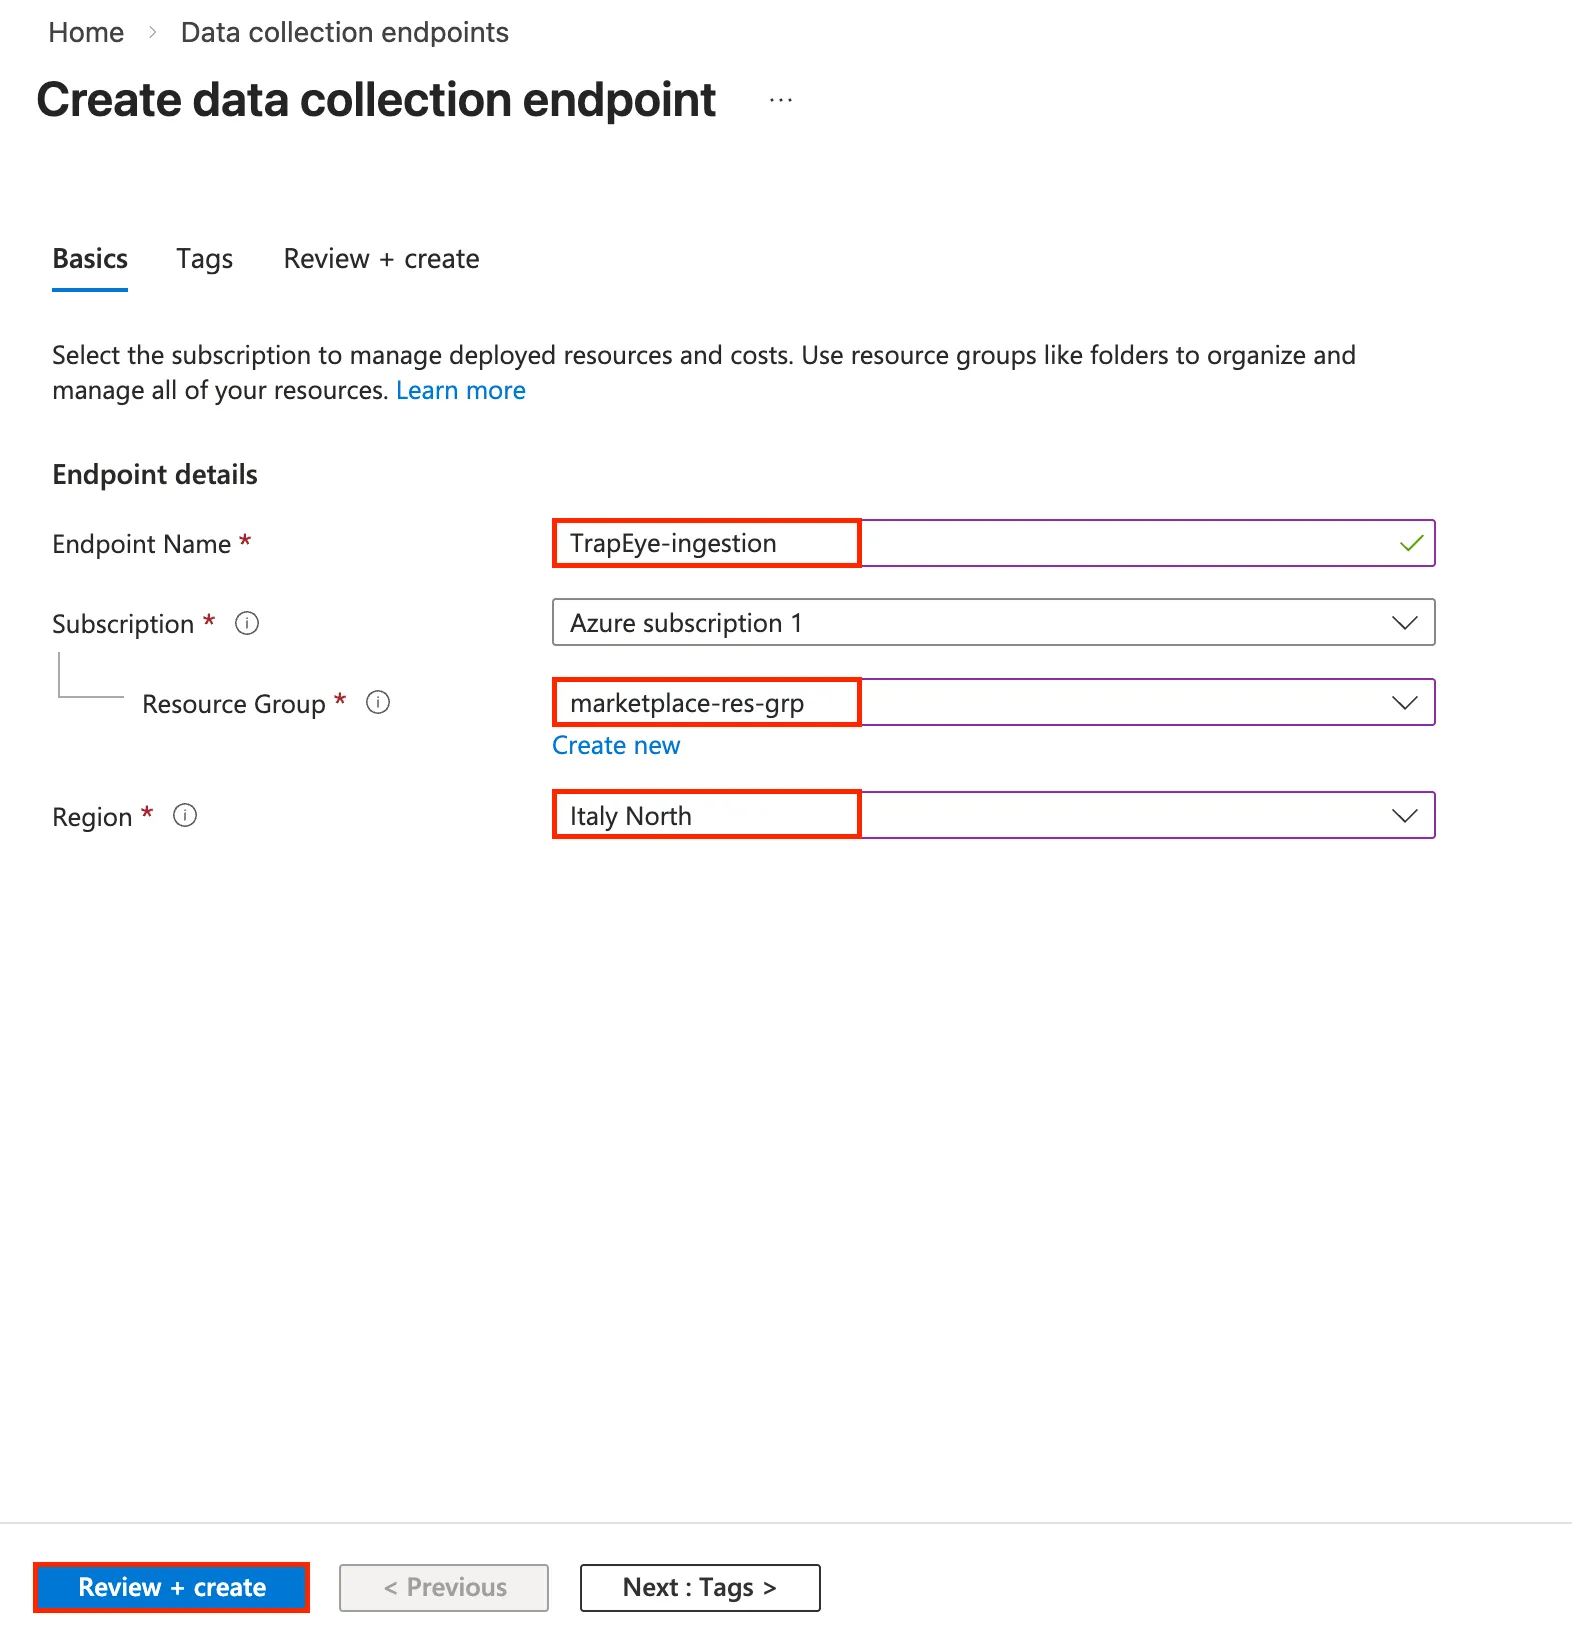
After the DCE is created, from the Overview page, copy the
Logs Ingestion Endpoint URLvalue, you will need this value in the TrapEye configuration step.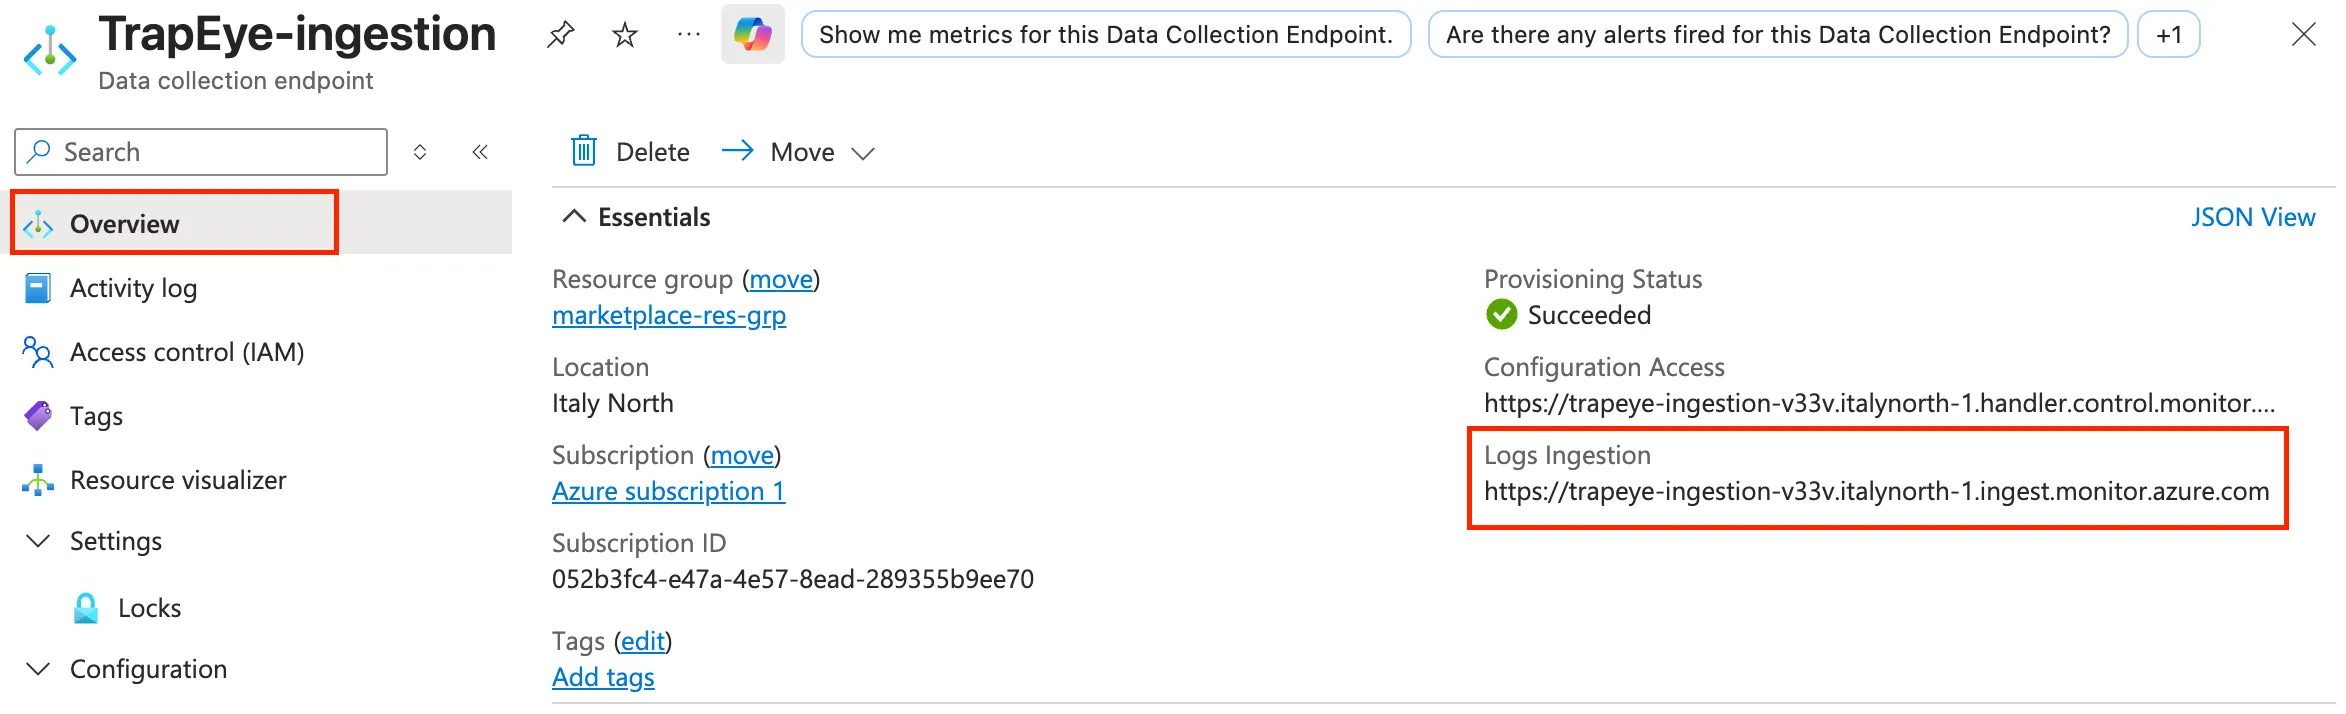
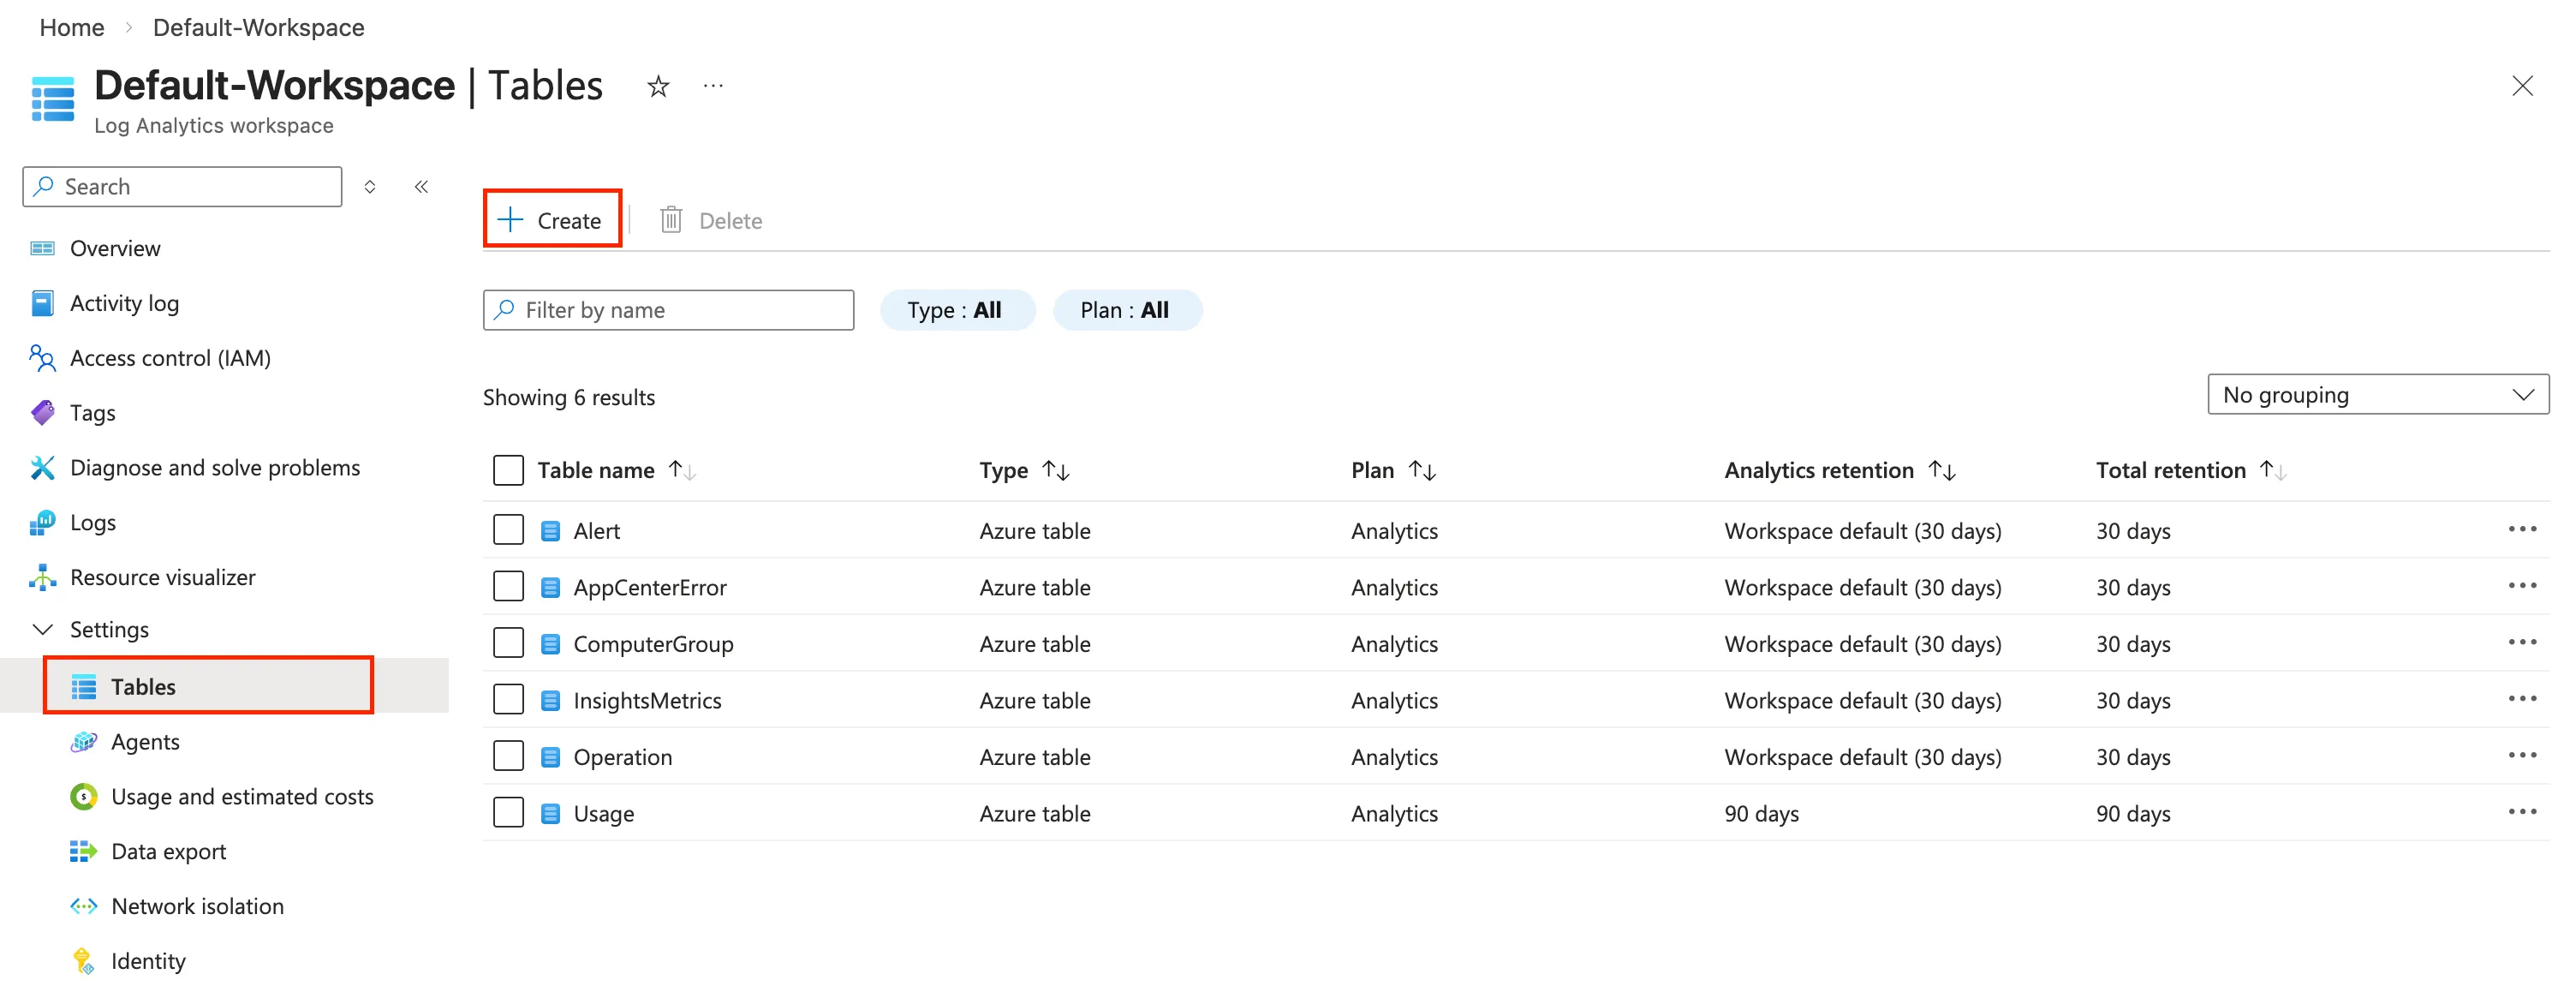
Create Tables in Log Analytics workspace
Section titled “Create Tables in Log Analytics workspace”To store TrapEye events in Sentinel, you need to create two custom tables in your Log Analytics workspace: one for threats and another for interactions.
In the Azure Portal, navigate to Log Analytics workspaces and select your workspace.
Click on Tables > Create.
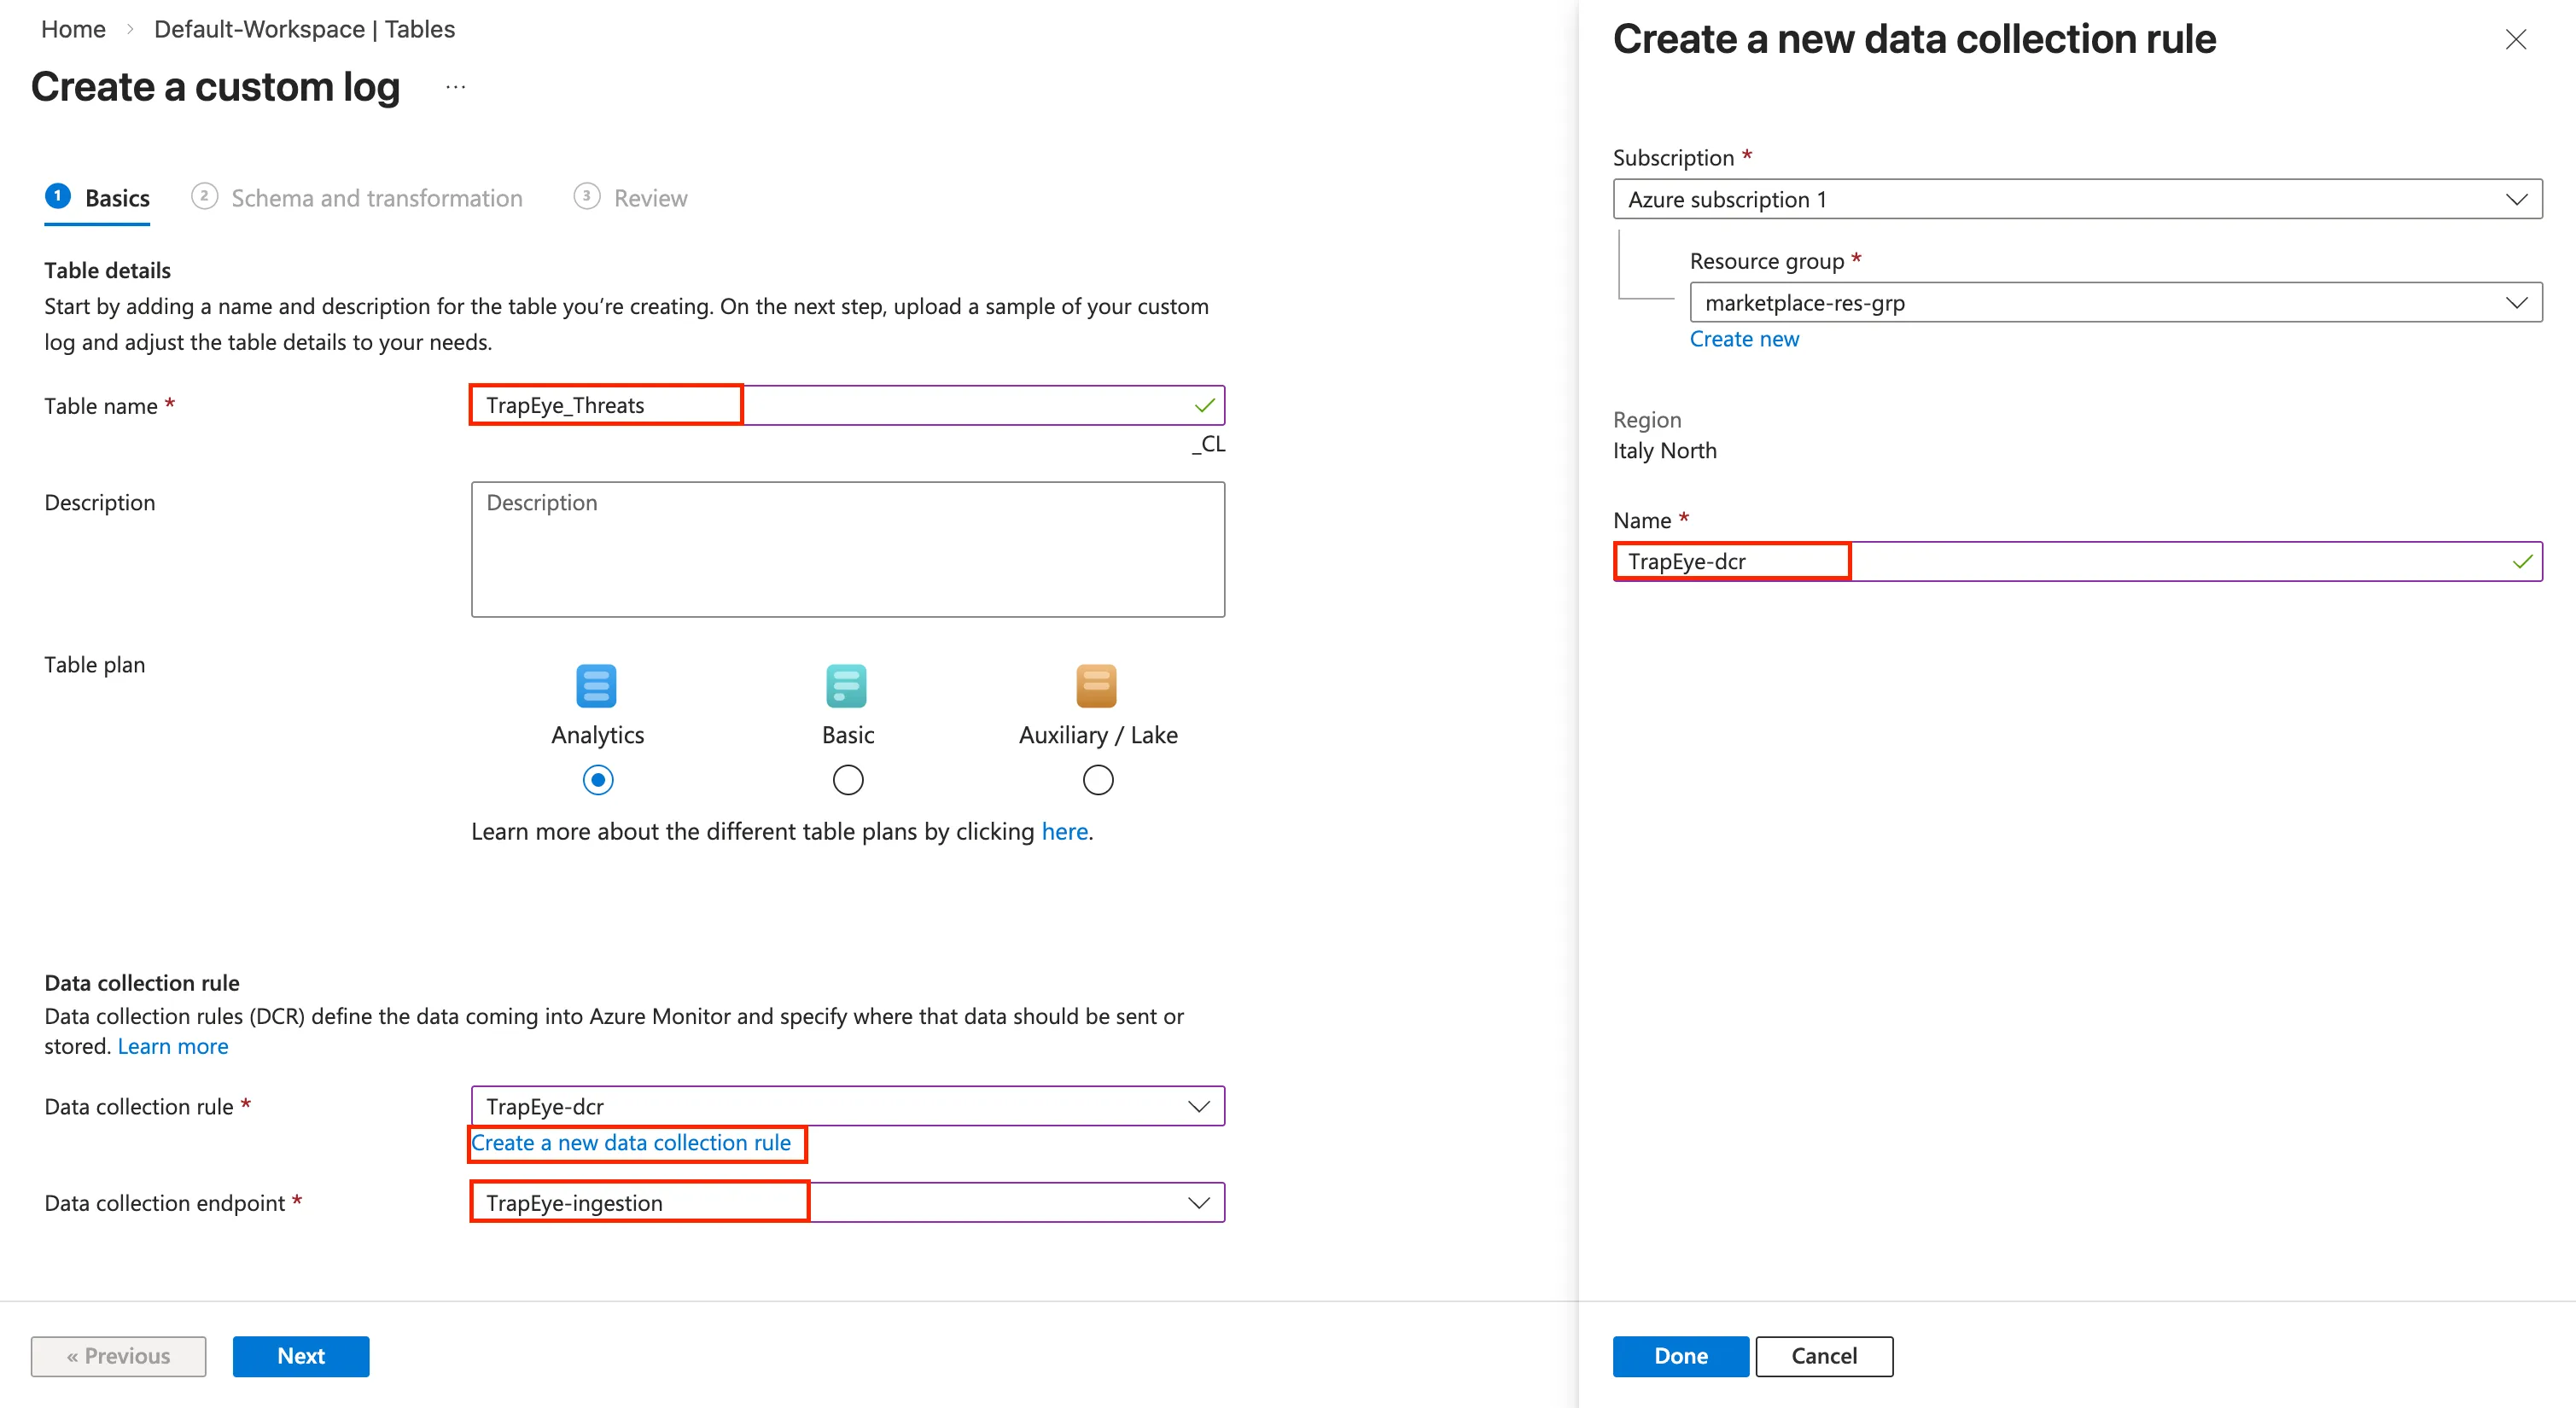
Specify a
Table Name(e.g.,TrapEye_Threats), set theTable PlantoAnalytics.For the Data Collection Rule (DCR), select
Create new data collection ruleand choose a name for the DCR (e.g.,TrapEye-dcr).For the Data Collection Endpoint (DCE), select the DCE you created in the previous step.
Download a sample threat JSON event from the TrapEye Event Schema documentation and upload it in the Sample Data section. This will allow Sentinel to automatically infer the table schema based on the event structure.
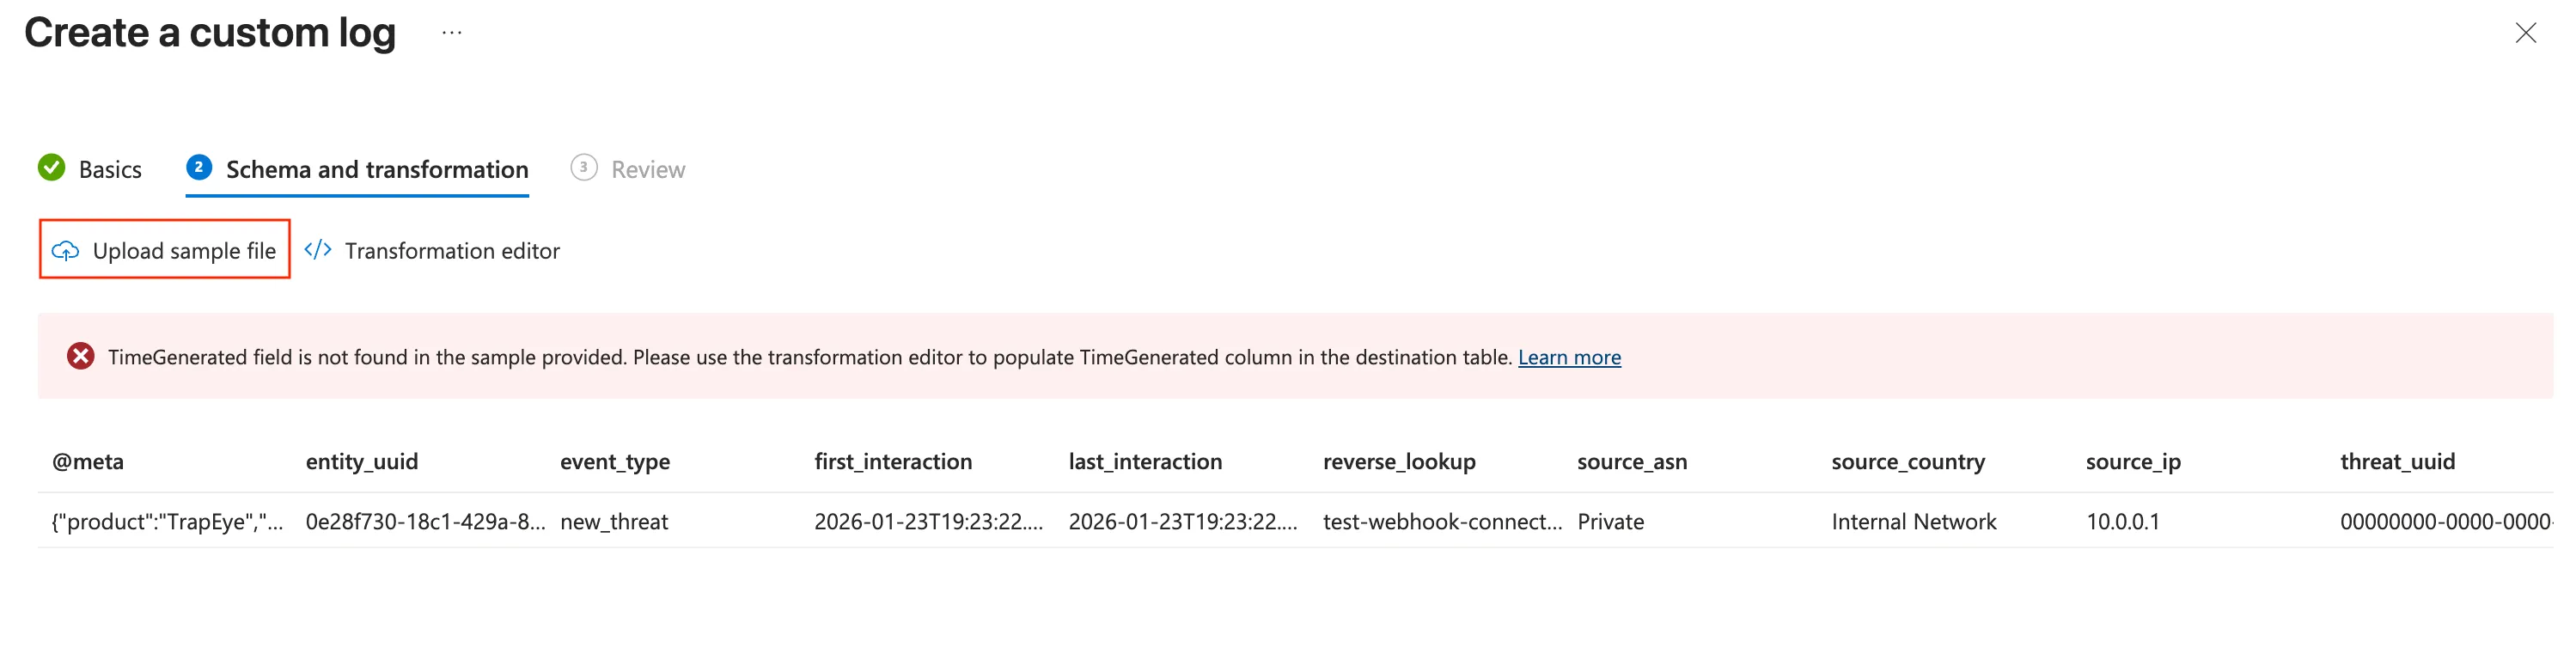
Click on Transformation editor and paste the following Kusto Query Language (KQL) code to extract relevant fields from the JSON event and create a structured table:
source| where event_type == "new_threat"| extendTimeGenerated = todatetime(first_interaction),Product = tostring(['@meta'].product),Vendor = tostring(['@meta'].vendor)| project-away ['@meta']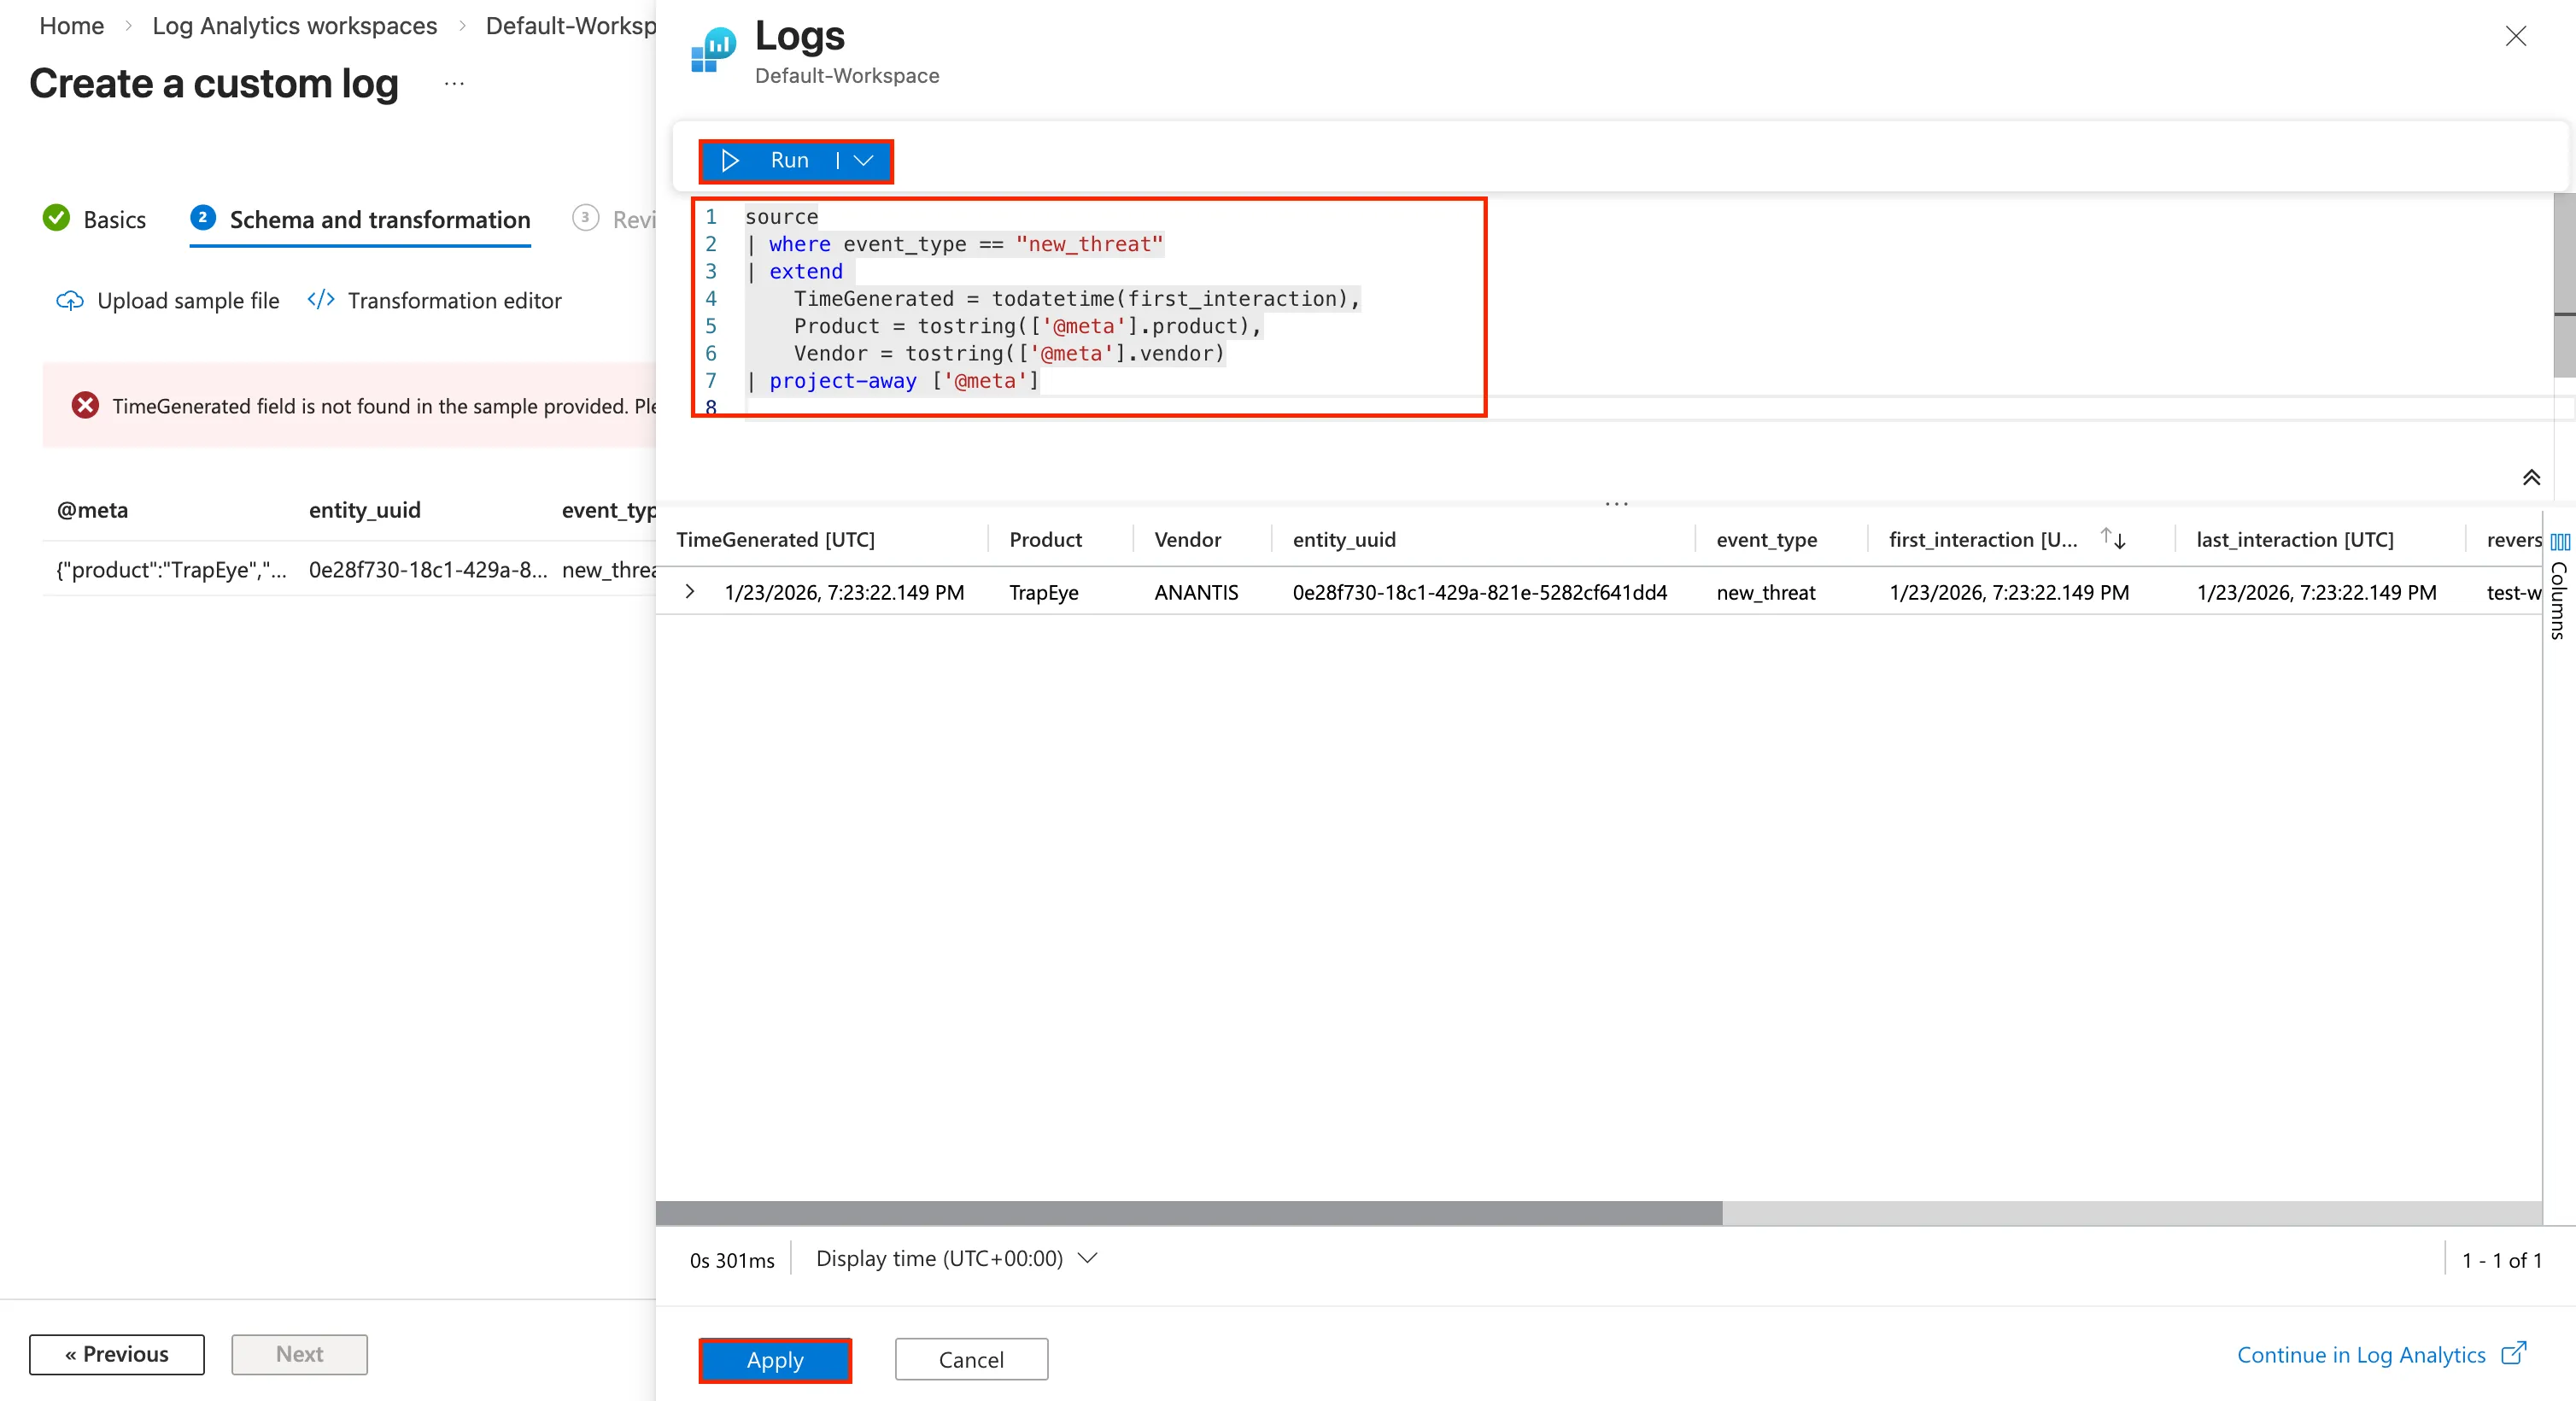
Run the query to verify the results. Then click on Apply to save the transformation and create the table.
Repeat the process to create the interactions table.
- Use the same DCR and DCE as the threats table.
- Upload a sample interaction JSON event available here.
- Use the following KQL code in the transformation editor:source| where event_type == "new_interaction"| extendTimeGenerated = todatetime(timestamp),Product = tostring(['@meta'].product),Vendor = tostring(['@meta'].vendor)| project-away ['@meta']
After both tables are created, navigate to the Data Collection Rules page.
From the Overview menu, copy the
Immutable IDvalue, you will need this value later.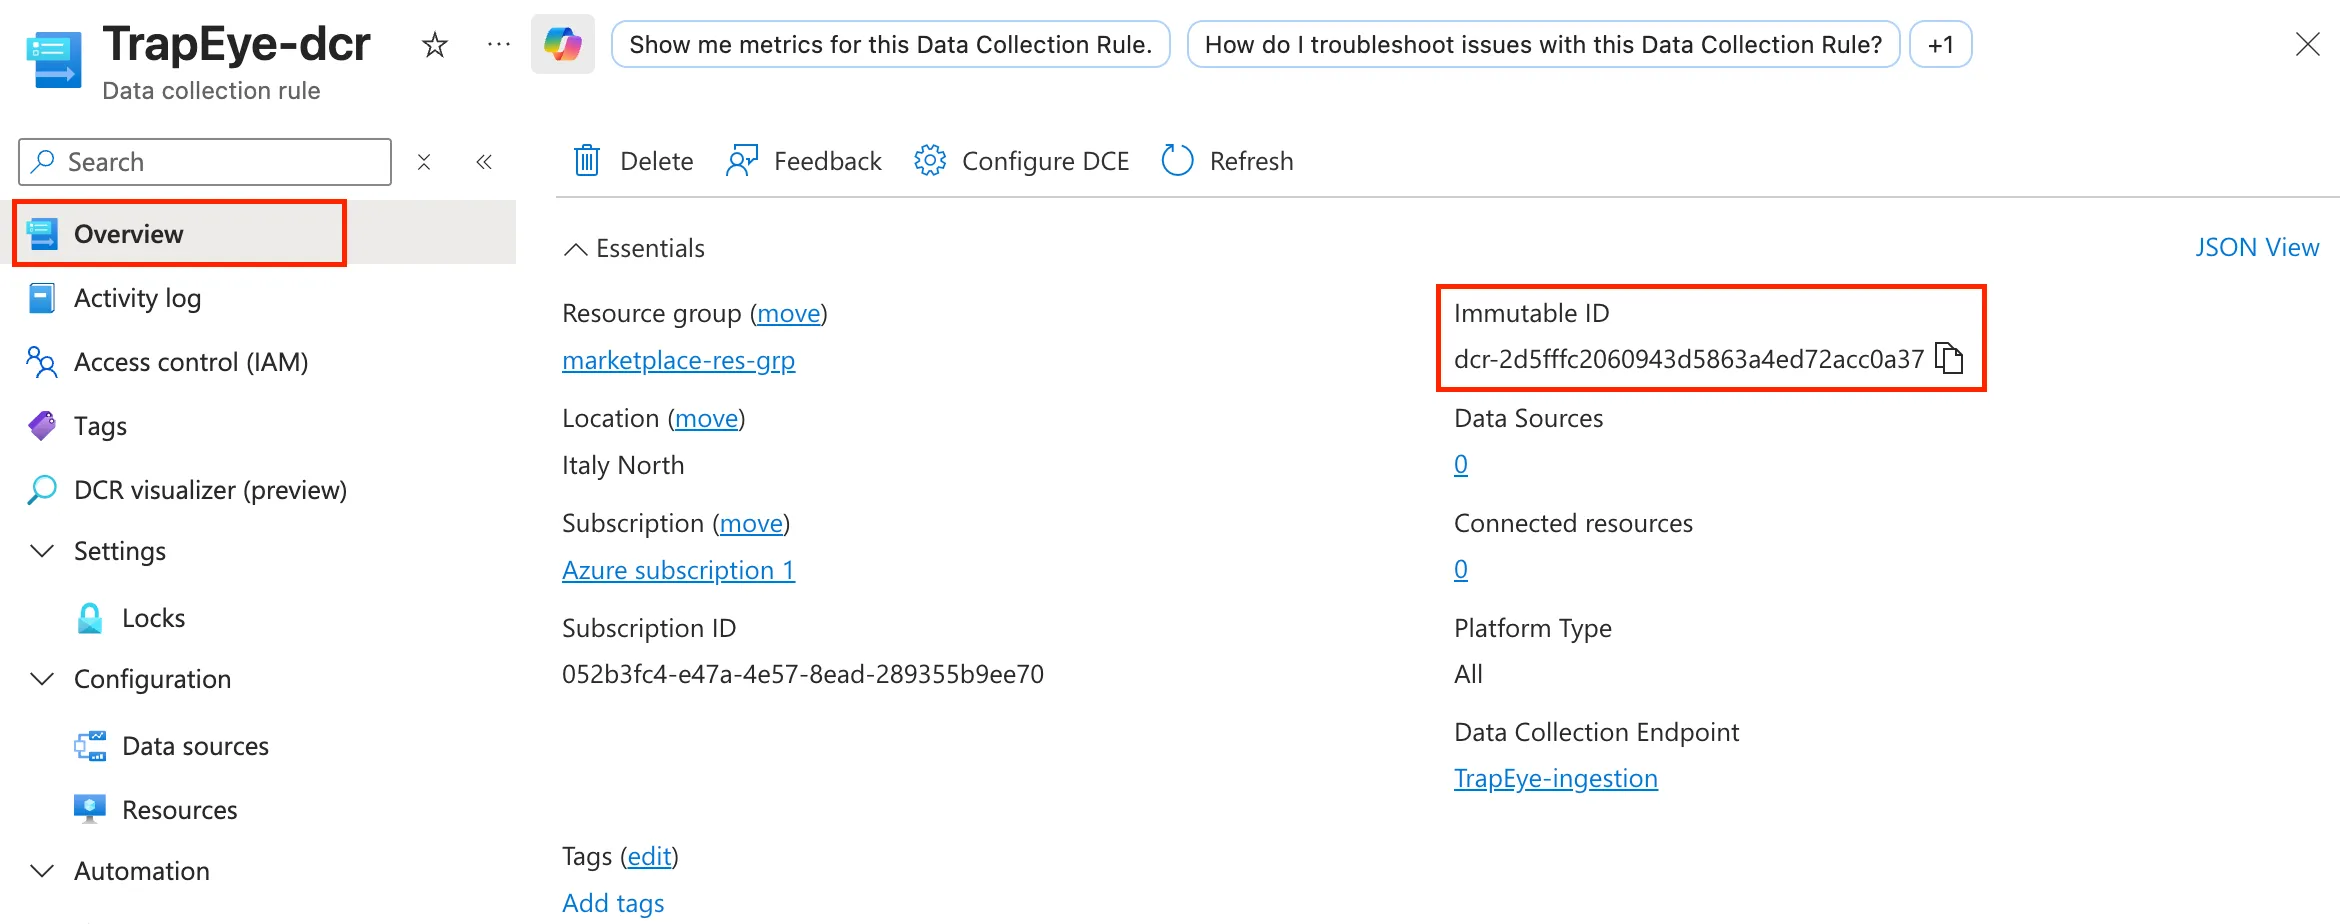
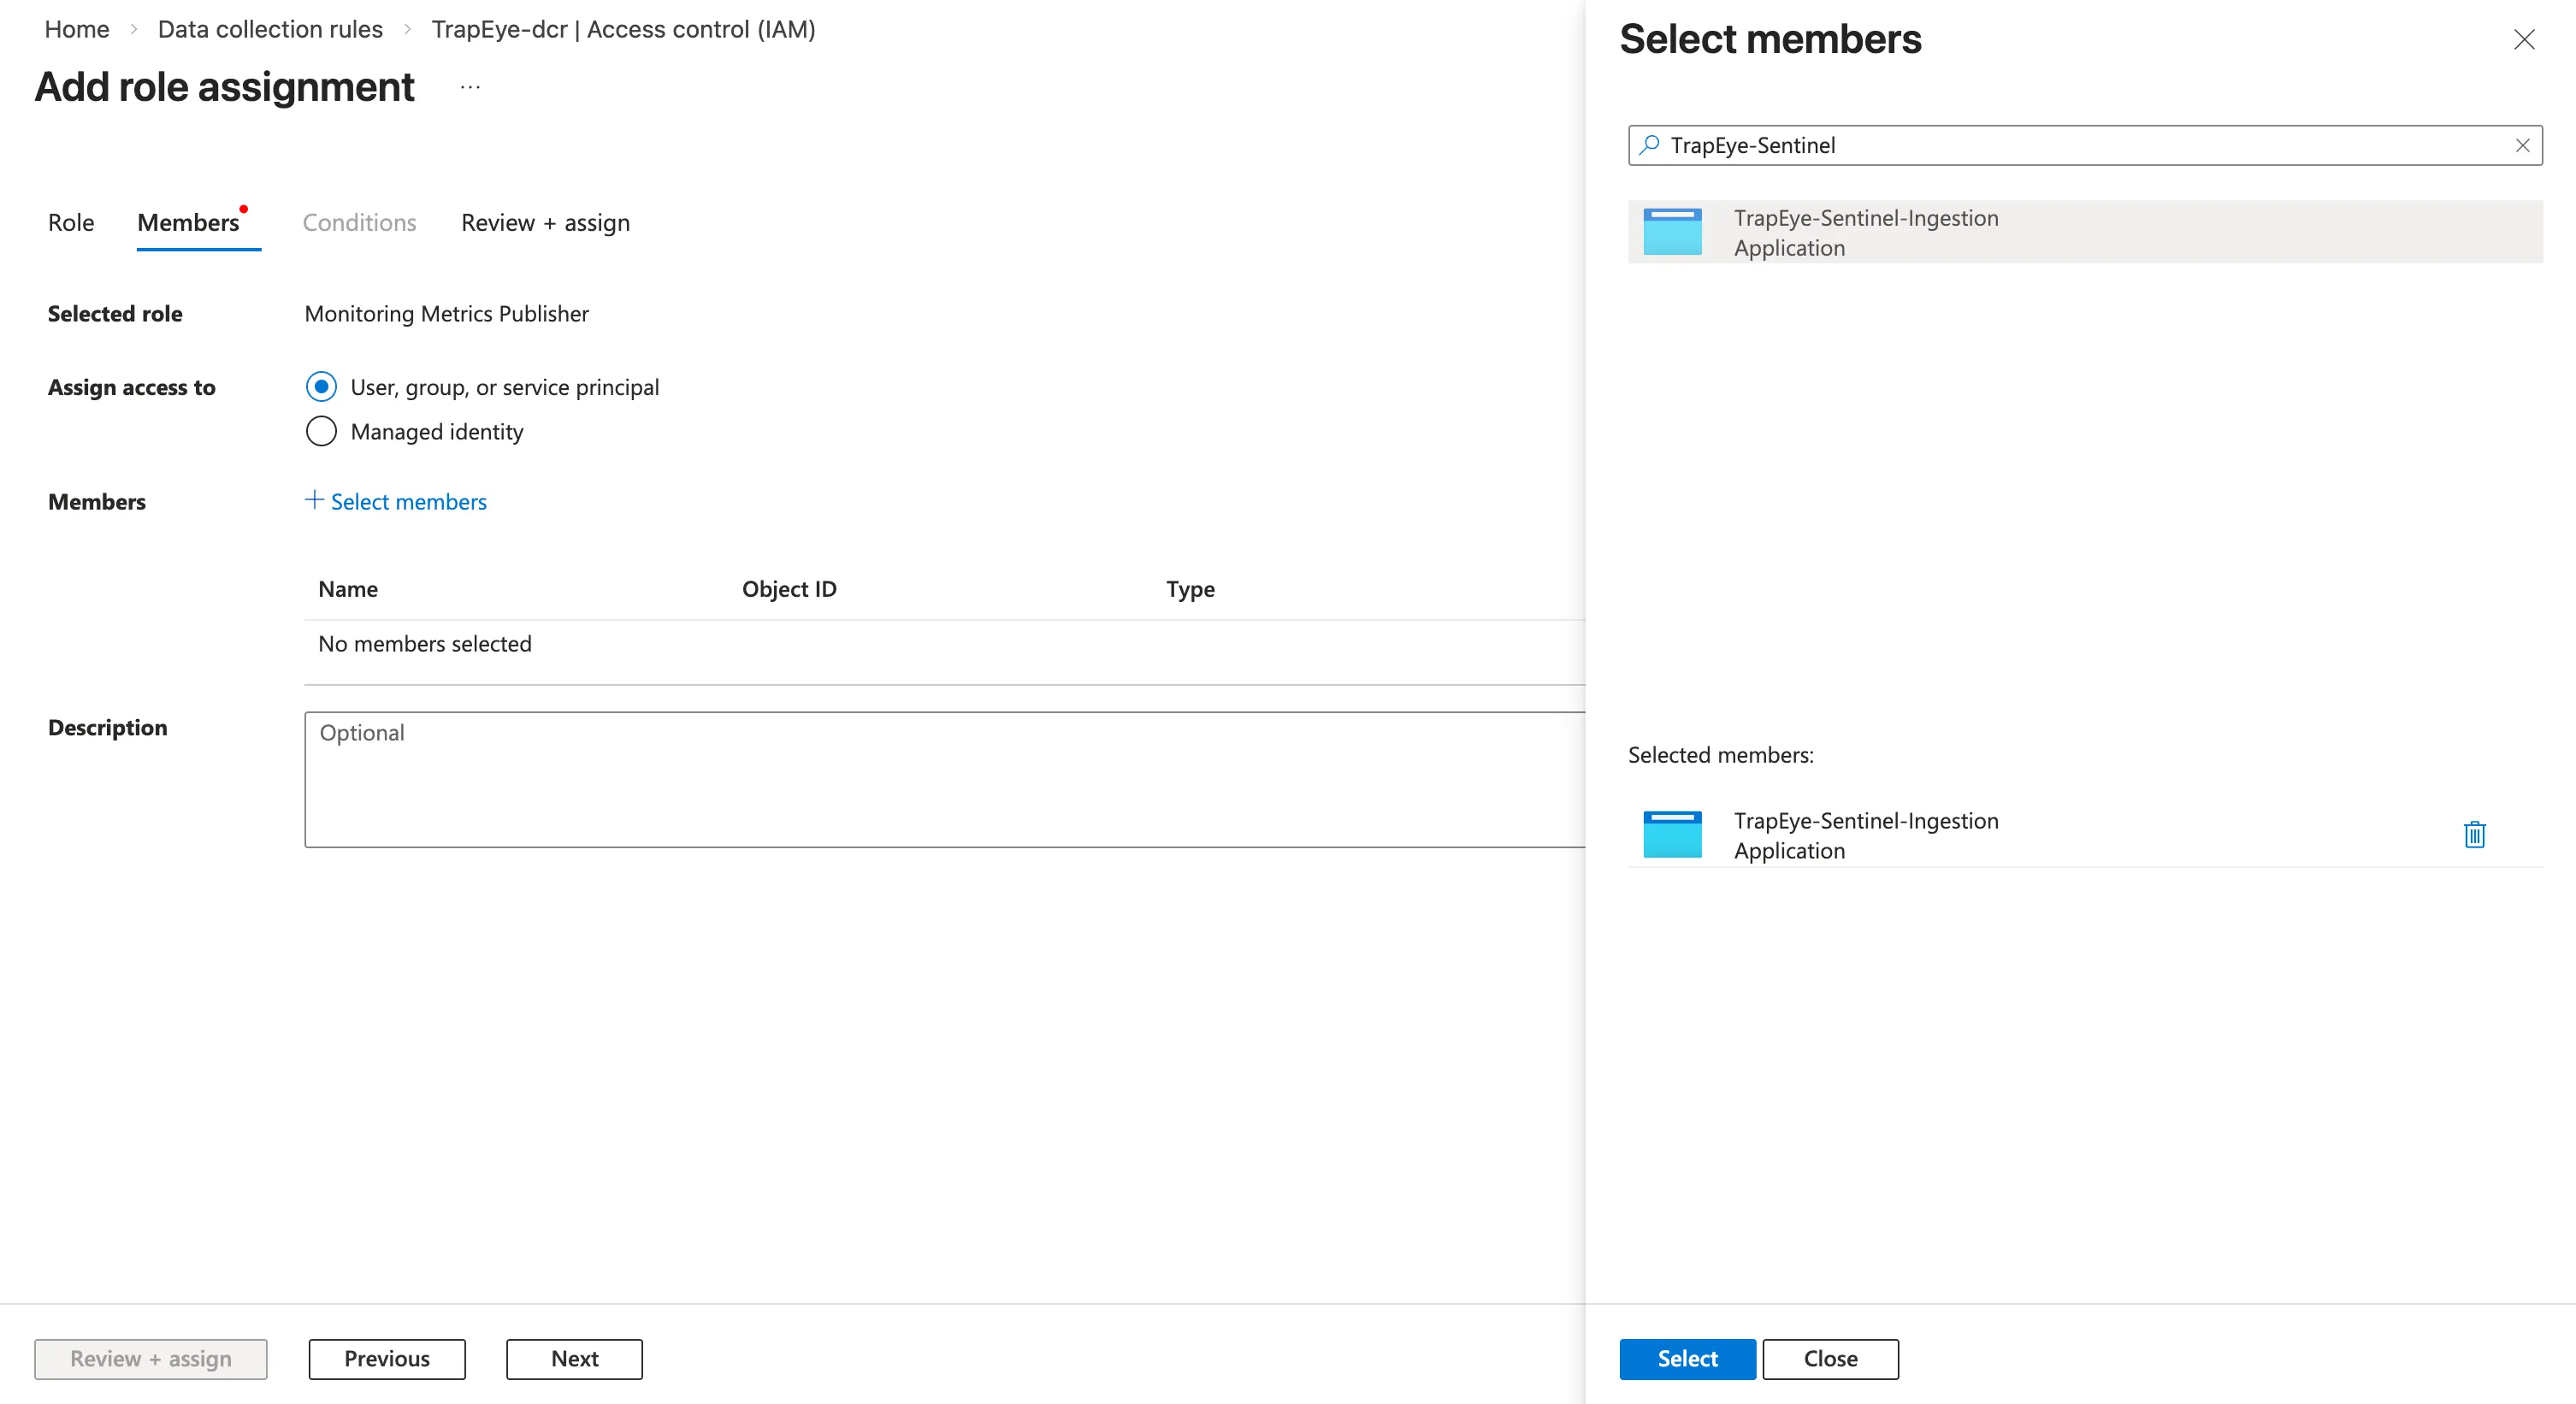
Navigate to the Access Control (IAM) section to assign permissions to the Microsoft Entra application created in the first step.
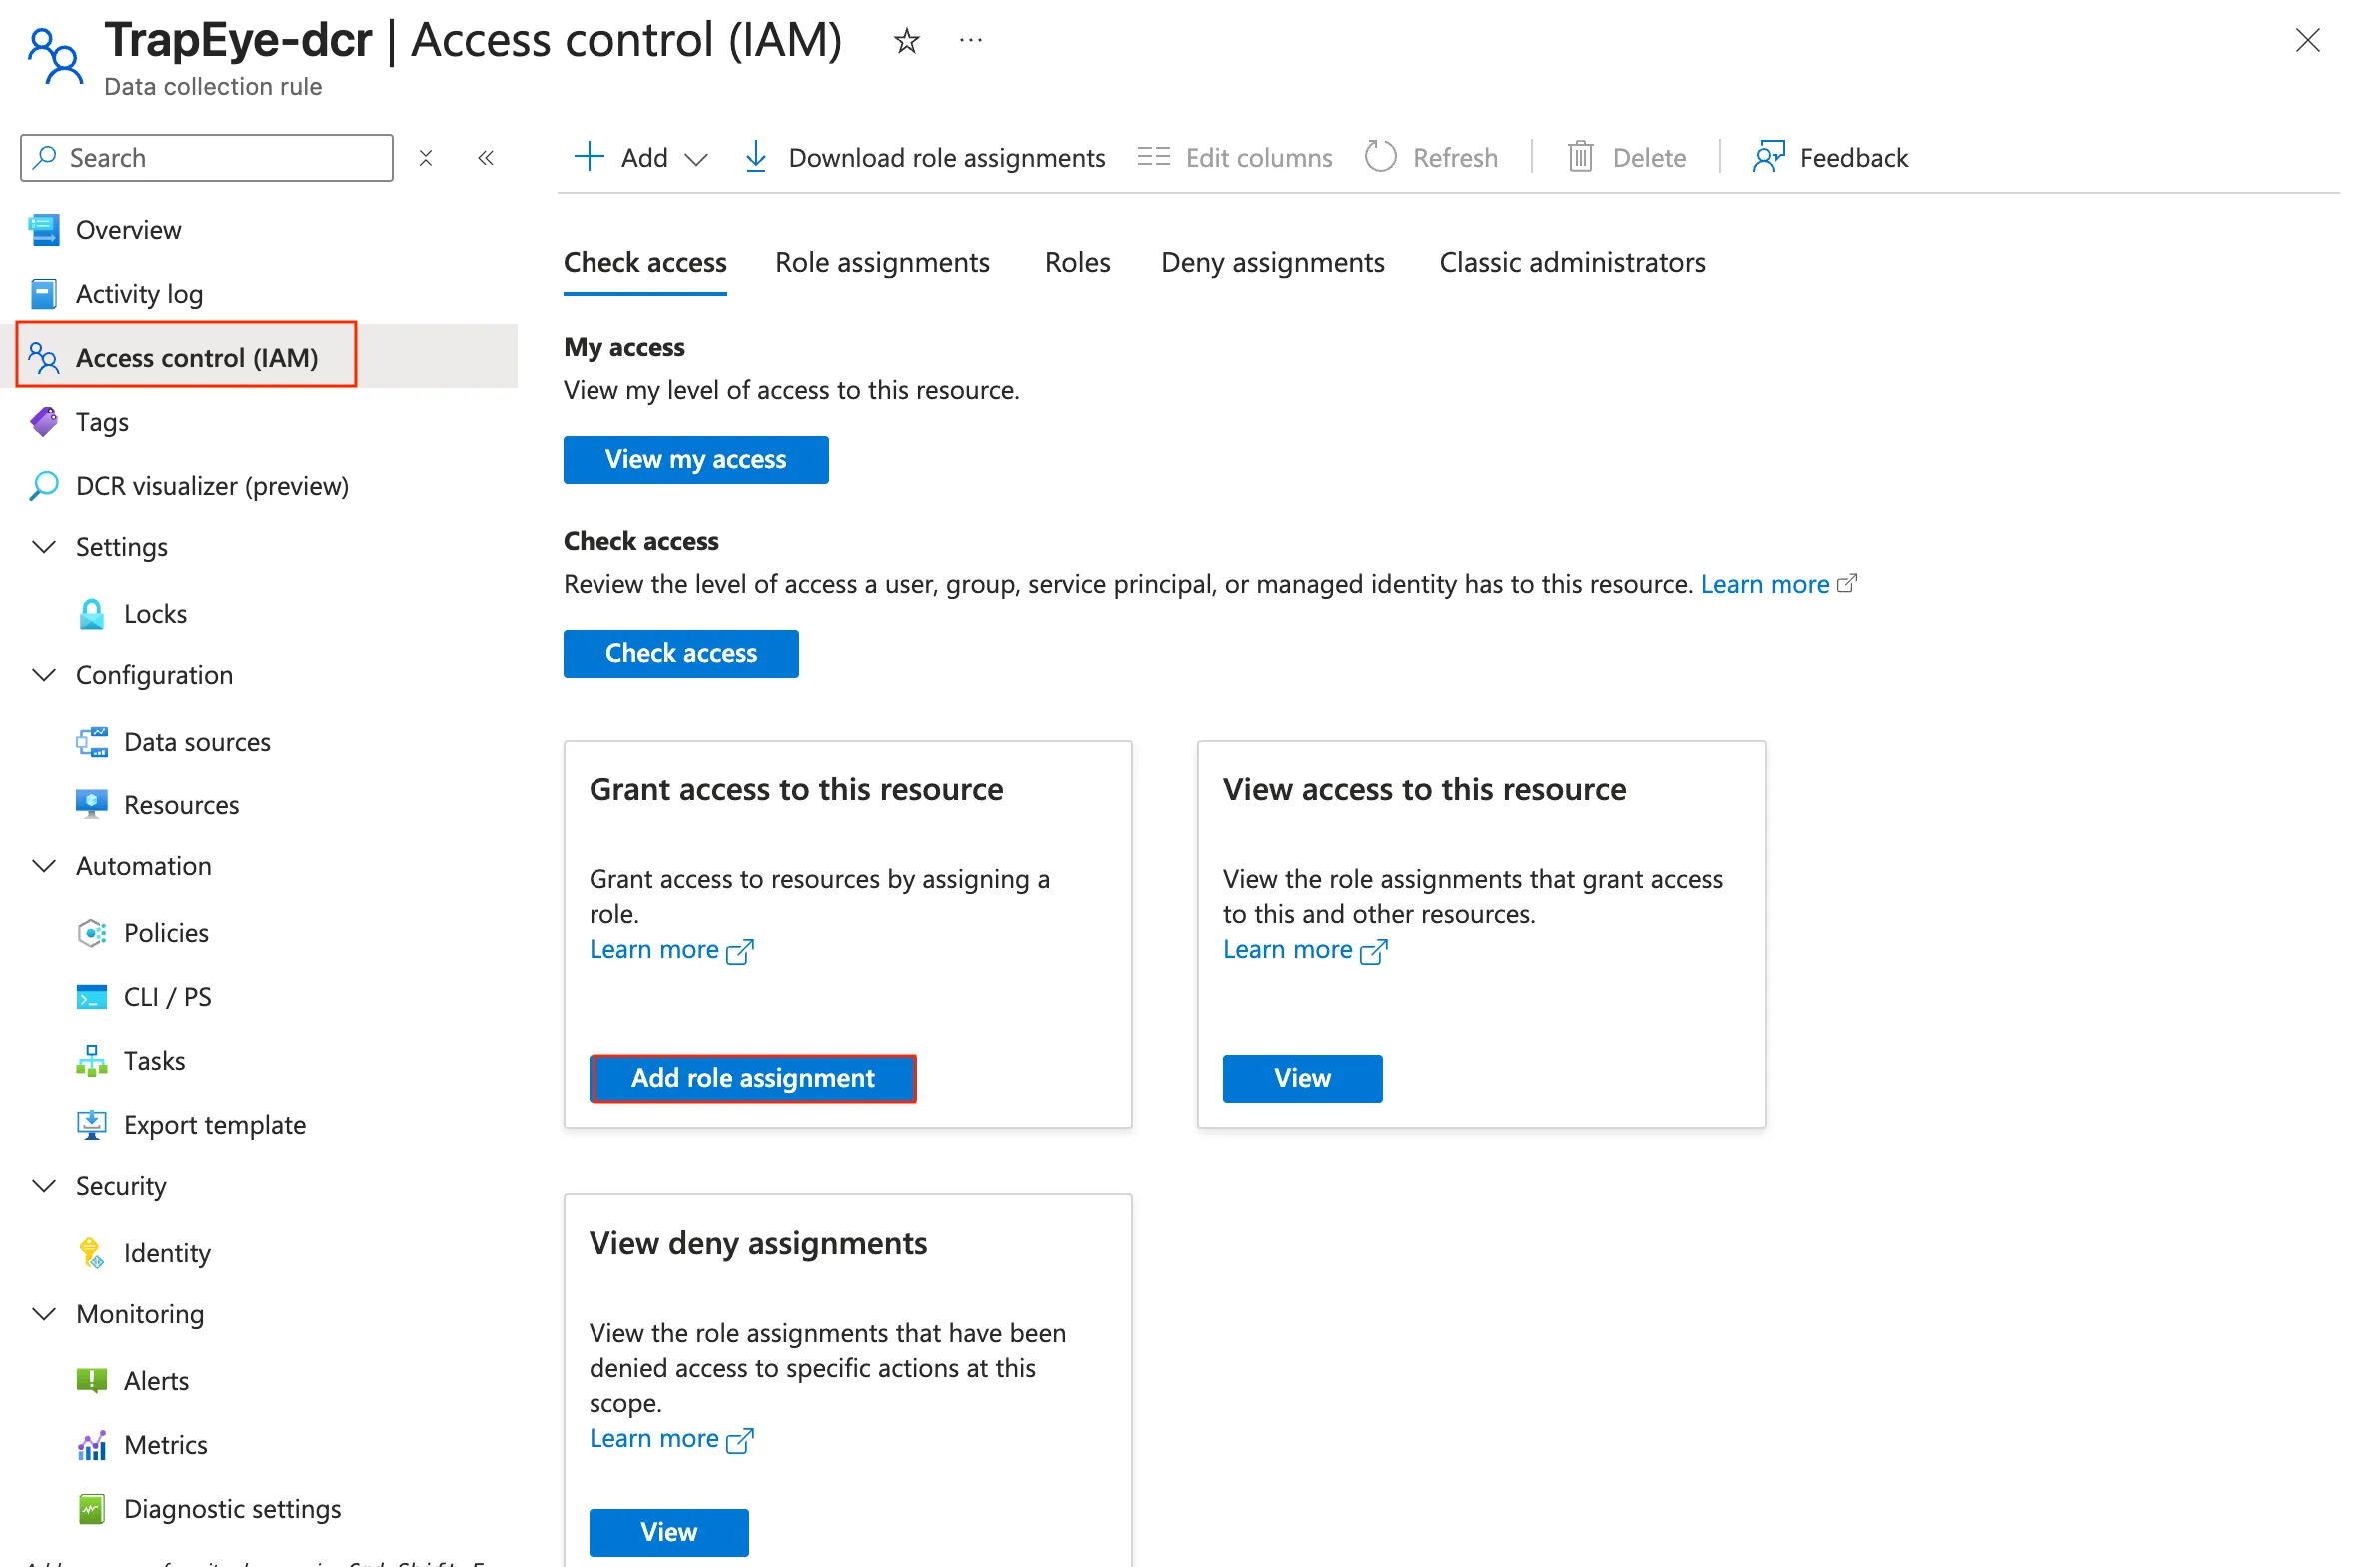
Click on Add role assignment.
Search for the role
Monitoring Metrics Publisher, select it and click Next.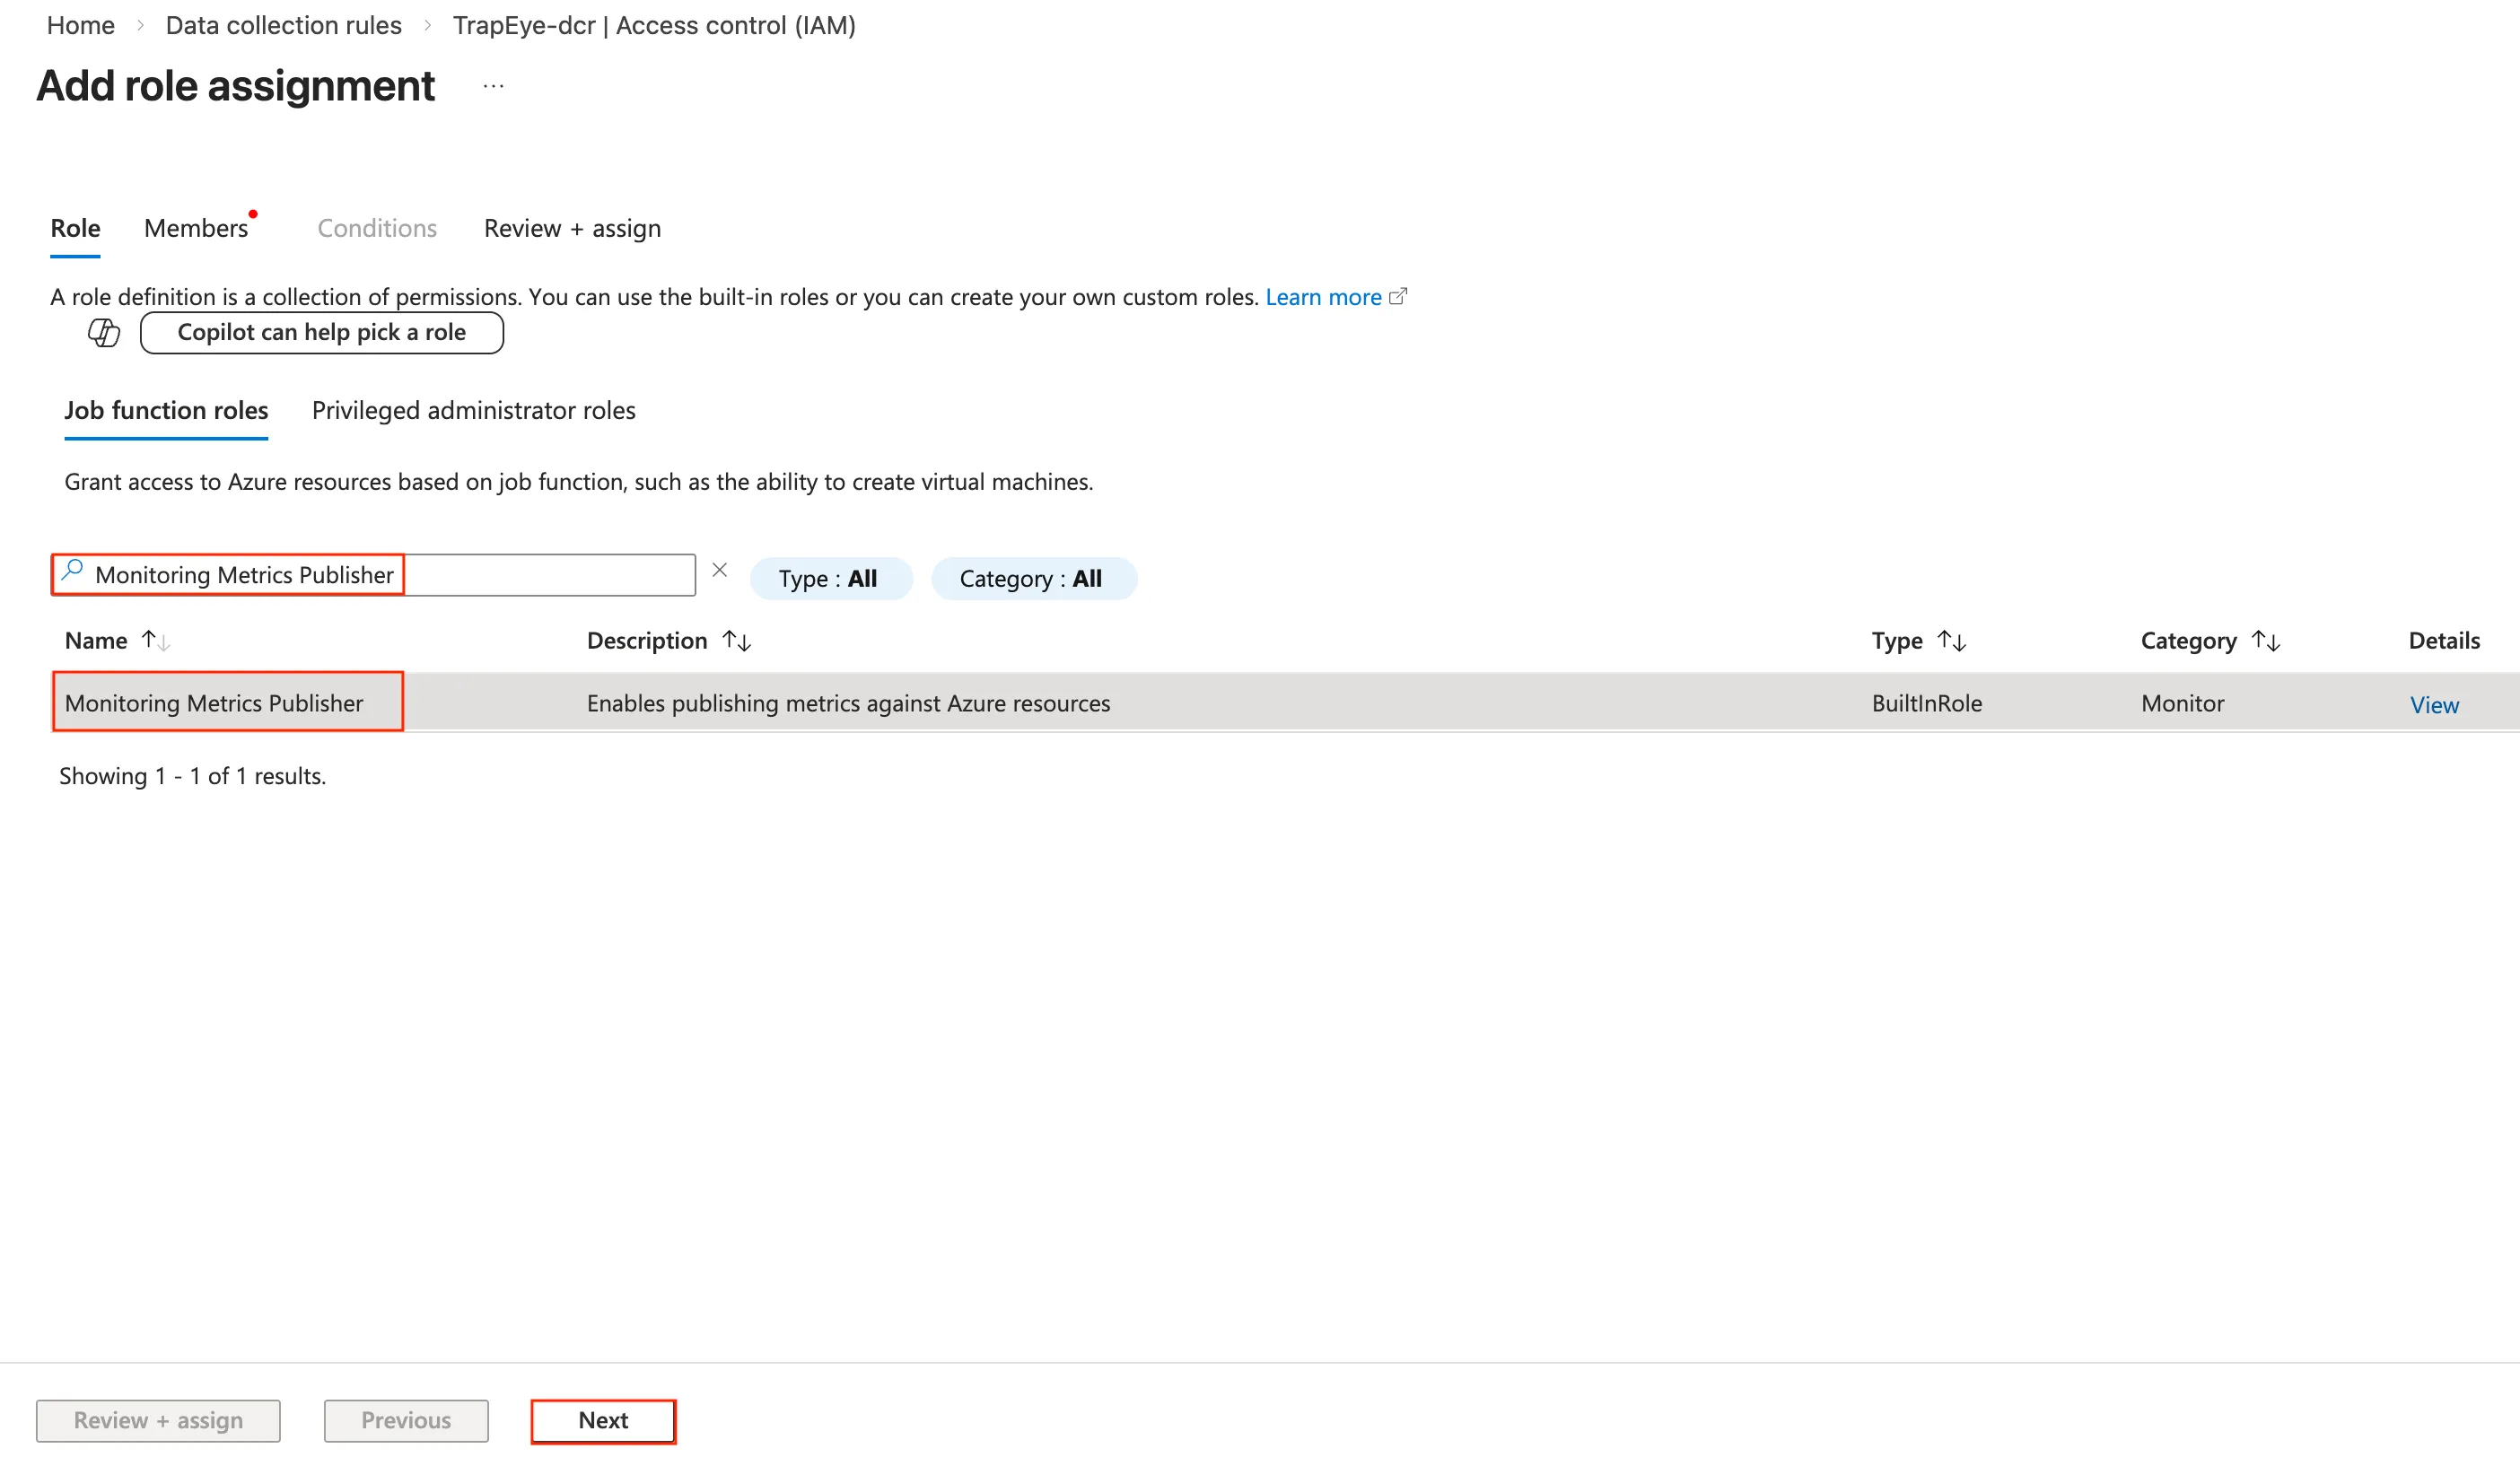
In the new page, select User, group, or service principal and search for the name of the Microsoft Entra application created in the first step. Select it and confirm the role assignment.
Configure the Sentinel Connector in TrapEye
Section titled “Configure the Sentinel Connector in TrapEye”Log in to the TrapEye Portal
Navigate to Settings → Integrations and select the JSON over HTTP card.
Enable JSON over HTTP Connector.
Choose the Microsoft Sentinel tab.
For the Data Collection Endpoint URL field, please use the following format with the two values copied earlier:
DCE LogsIngestion Endpoint URLDCR ImmutableId<DCE LogsIngestion Endpoint URL>/dataCollectionRules/<DCR ImmutableId>/streams/
For the Table Name fields, enter the names of the tables with the suffix
_CL(custom log). For example, if your table is namedTrapEye_Threats, enterTrapEye_Threats_CL.Enter the
Directory (tenant) ID,Application (client) IDandClient Secretvalues from the Microsoft Entra application created in the first step.
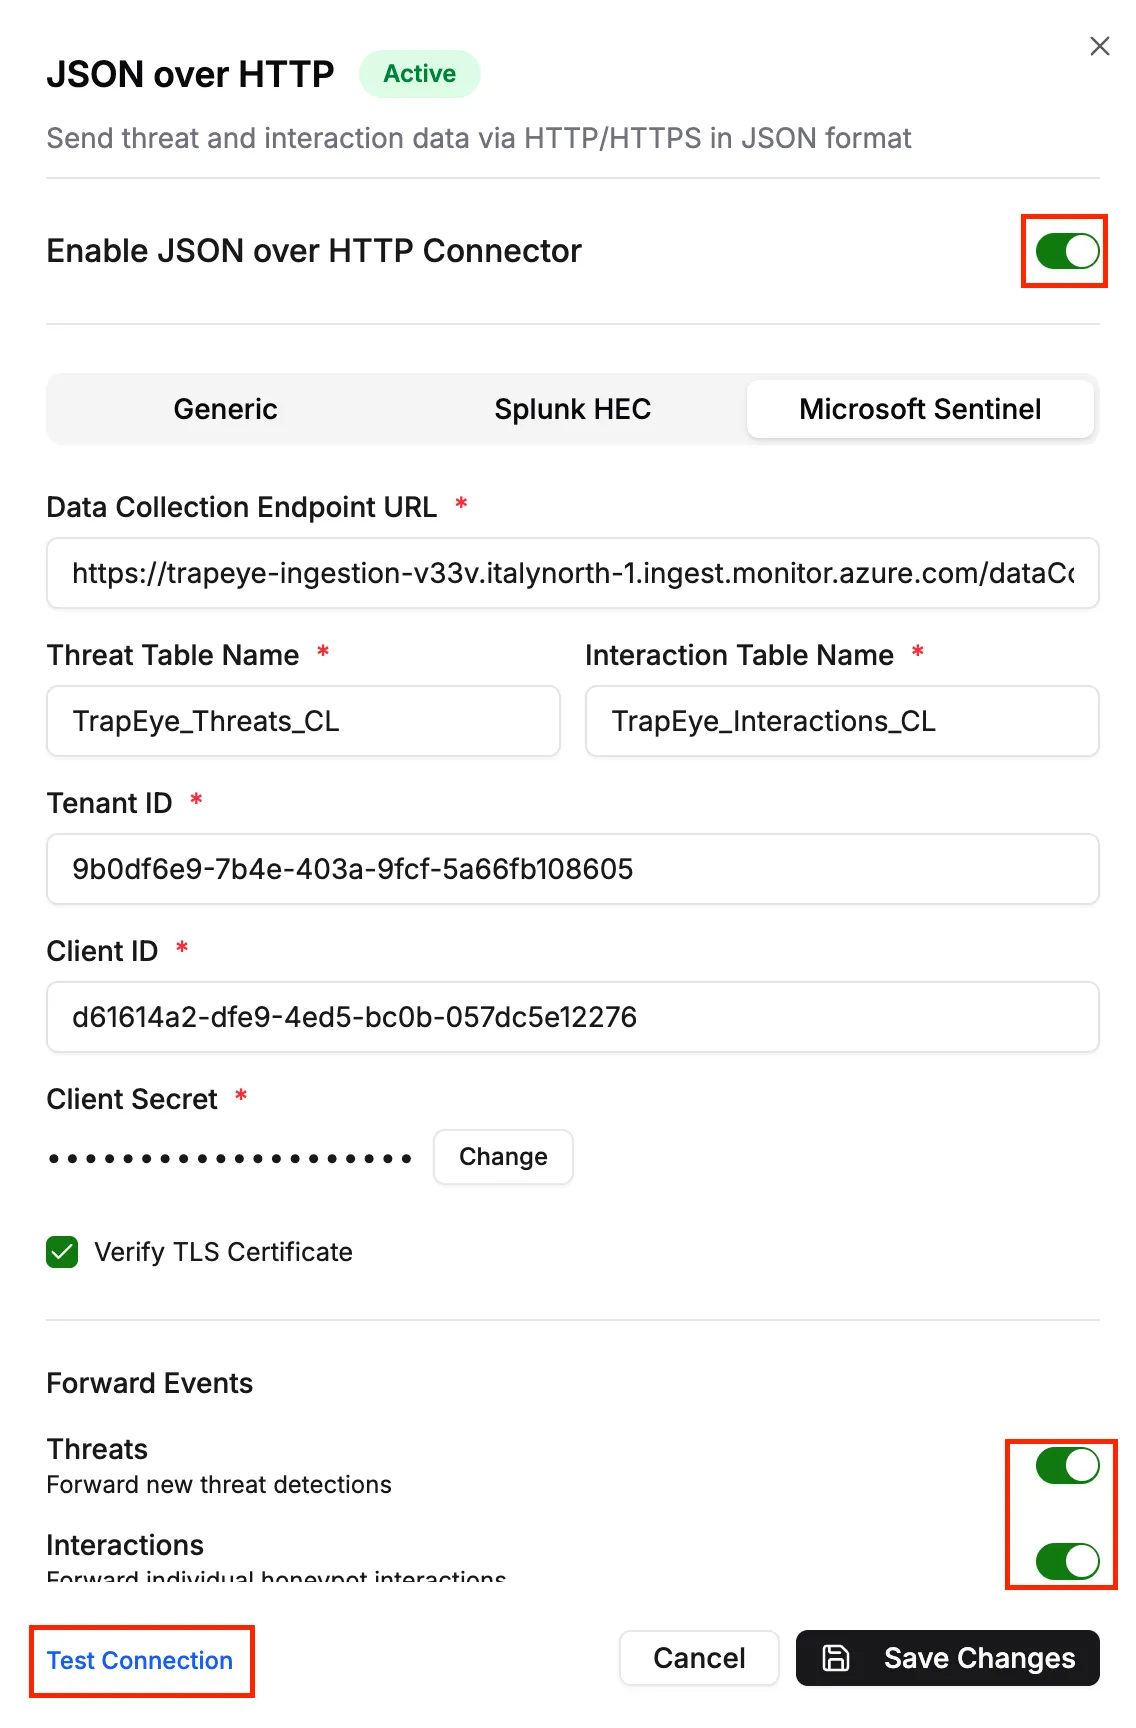
- Click Save Changes to apply the configuration.
Test the Log Flow
Section titled “Test the Log Flow”With the connector enabled, click Test Connection in TrapEye.
Once the test event is sent successfully, navigate to your Log Analytics workspace in the Azure portal and run the following KQL queries to verify that events are received:
Threats table:
YourThreatsTableName_CLInteractions table:
YourInteractionsTableName_CL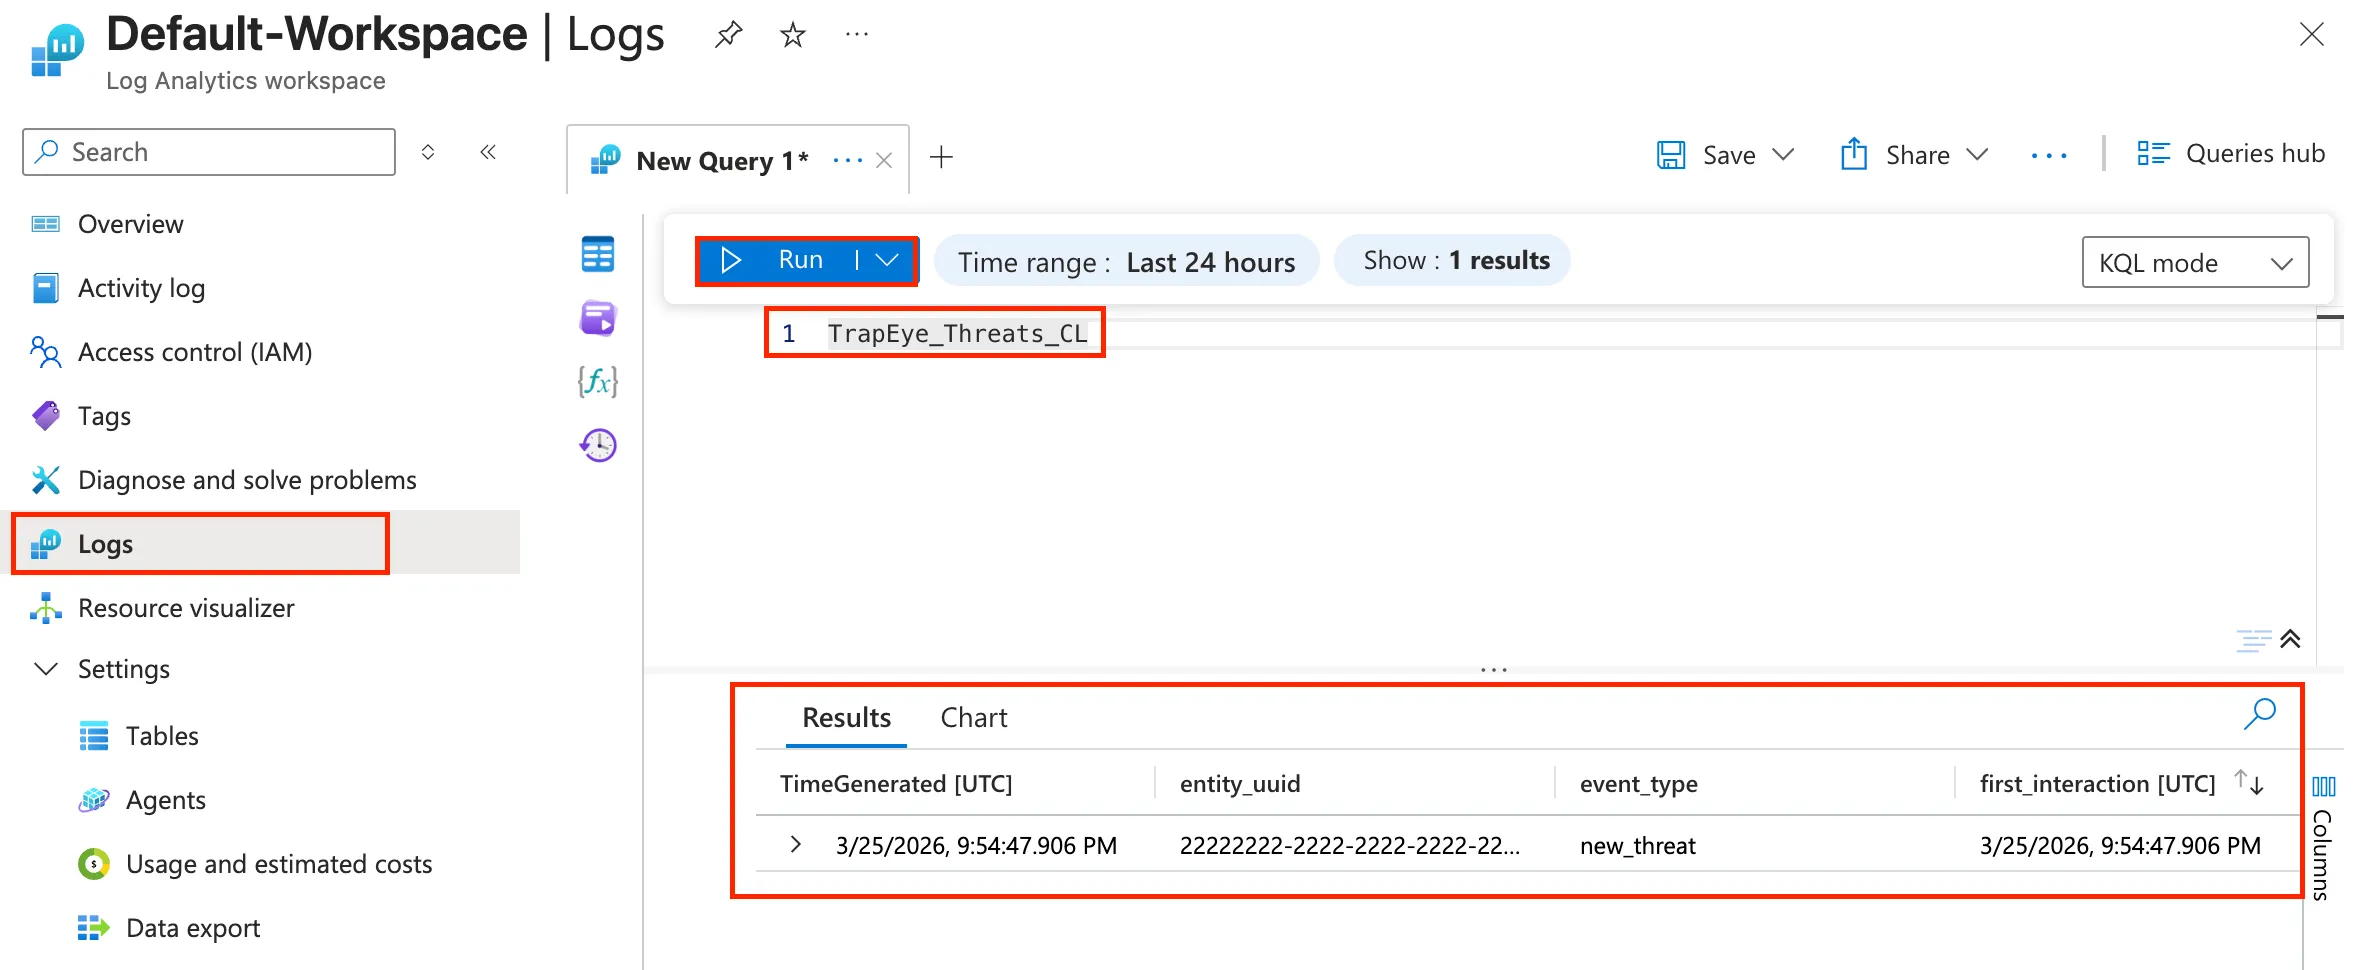
Optional: Create Analytics Rules
Section titled “Optional: Create Analytics Rules”Analytics rules allow you to automatically correlate TrapEye threats with Microsoft Sentinel incidents, and trigger automated response playbooks.
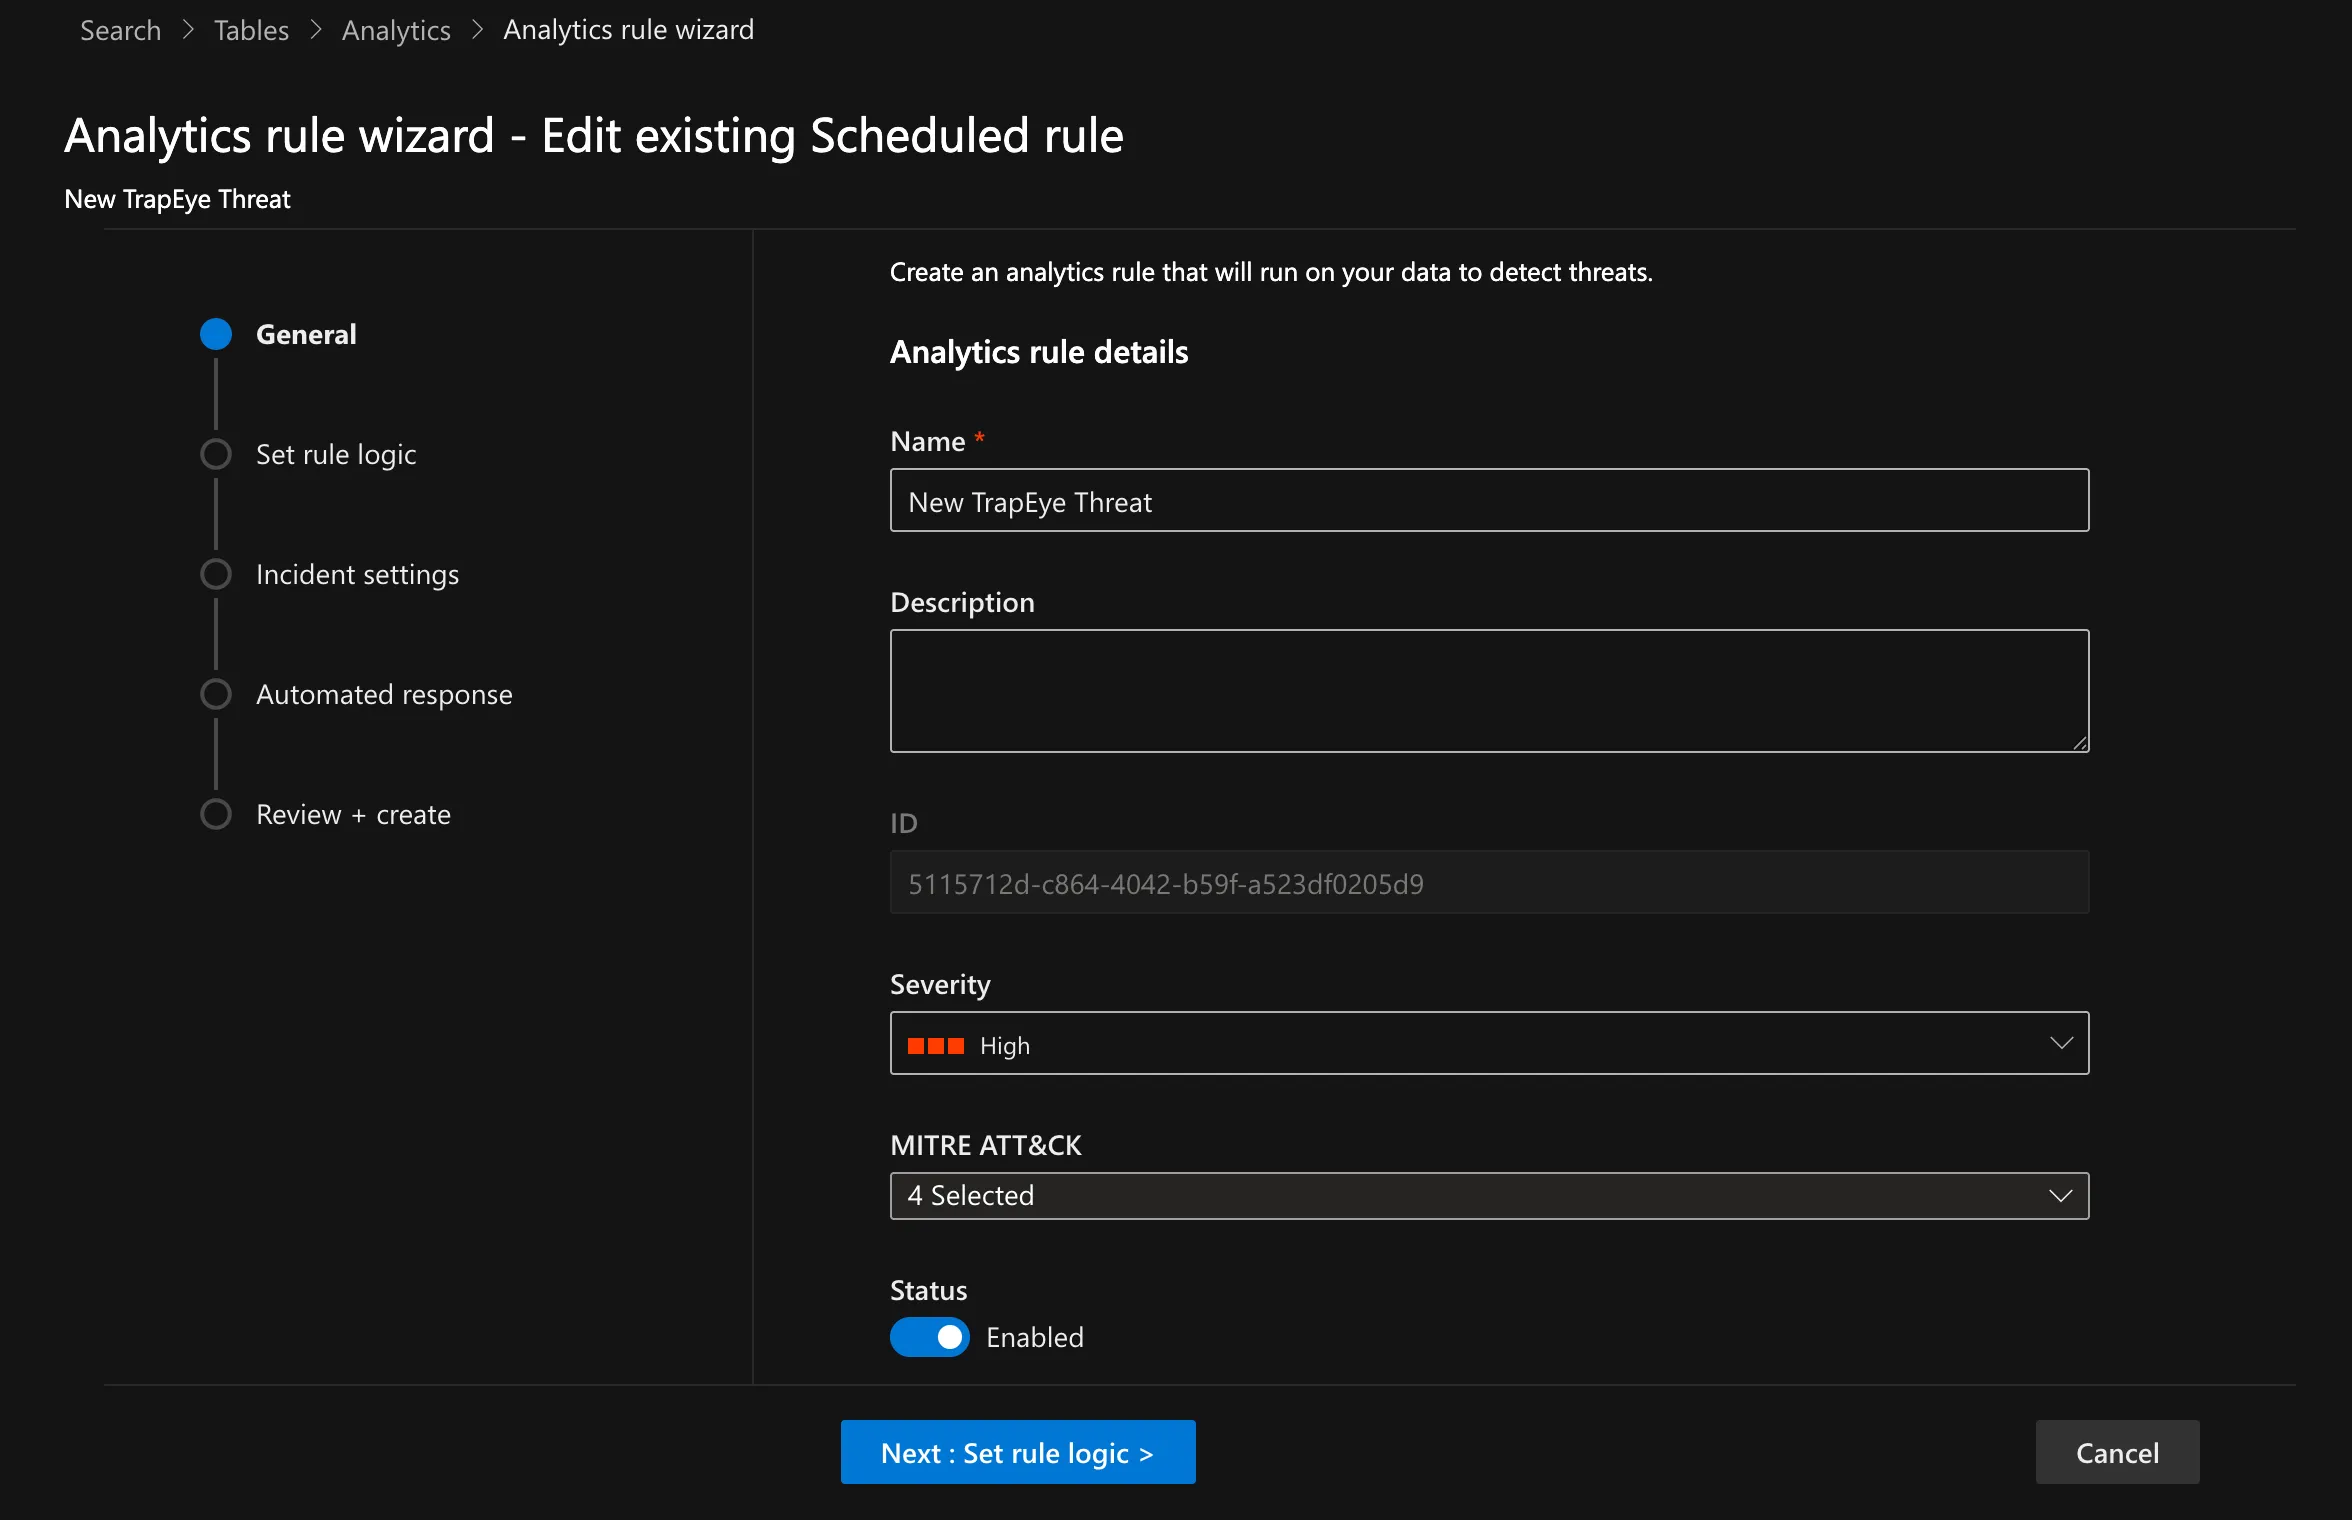
In the Microsoft Defender portal, navigate to Microsoft Sentinel → Analytics and click on Create → Scheduled query rule.

Set a
Namefor the rule and choose an appropriateSeveritylevel.For the
MITRE ATT&CKtechnique mapping, you can select:- Reconnaissance
- Credential Access
- Discovery
- Lateral Movement
In the Set rule logic → Rule query section, use the following KQL query as a base to create the logic for the rule:
YourThreatsTableName_CLIn the Alert enhancement → Entity mapping section:
- Map the
source_ipfield to the IP Address entity. - Map the
reverse_lookupfield to the DomainName entity.
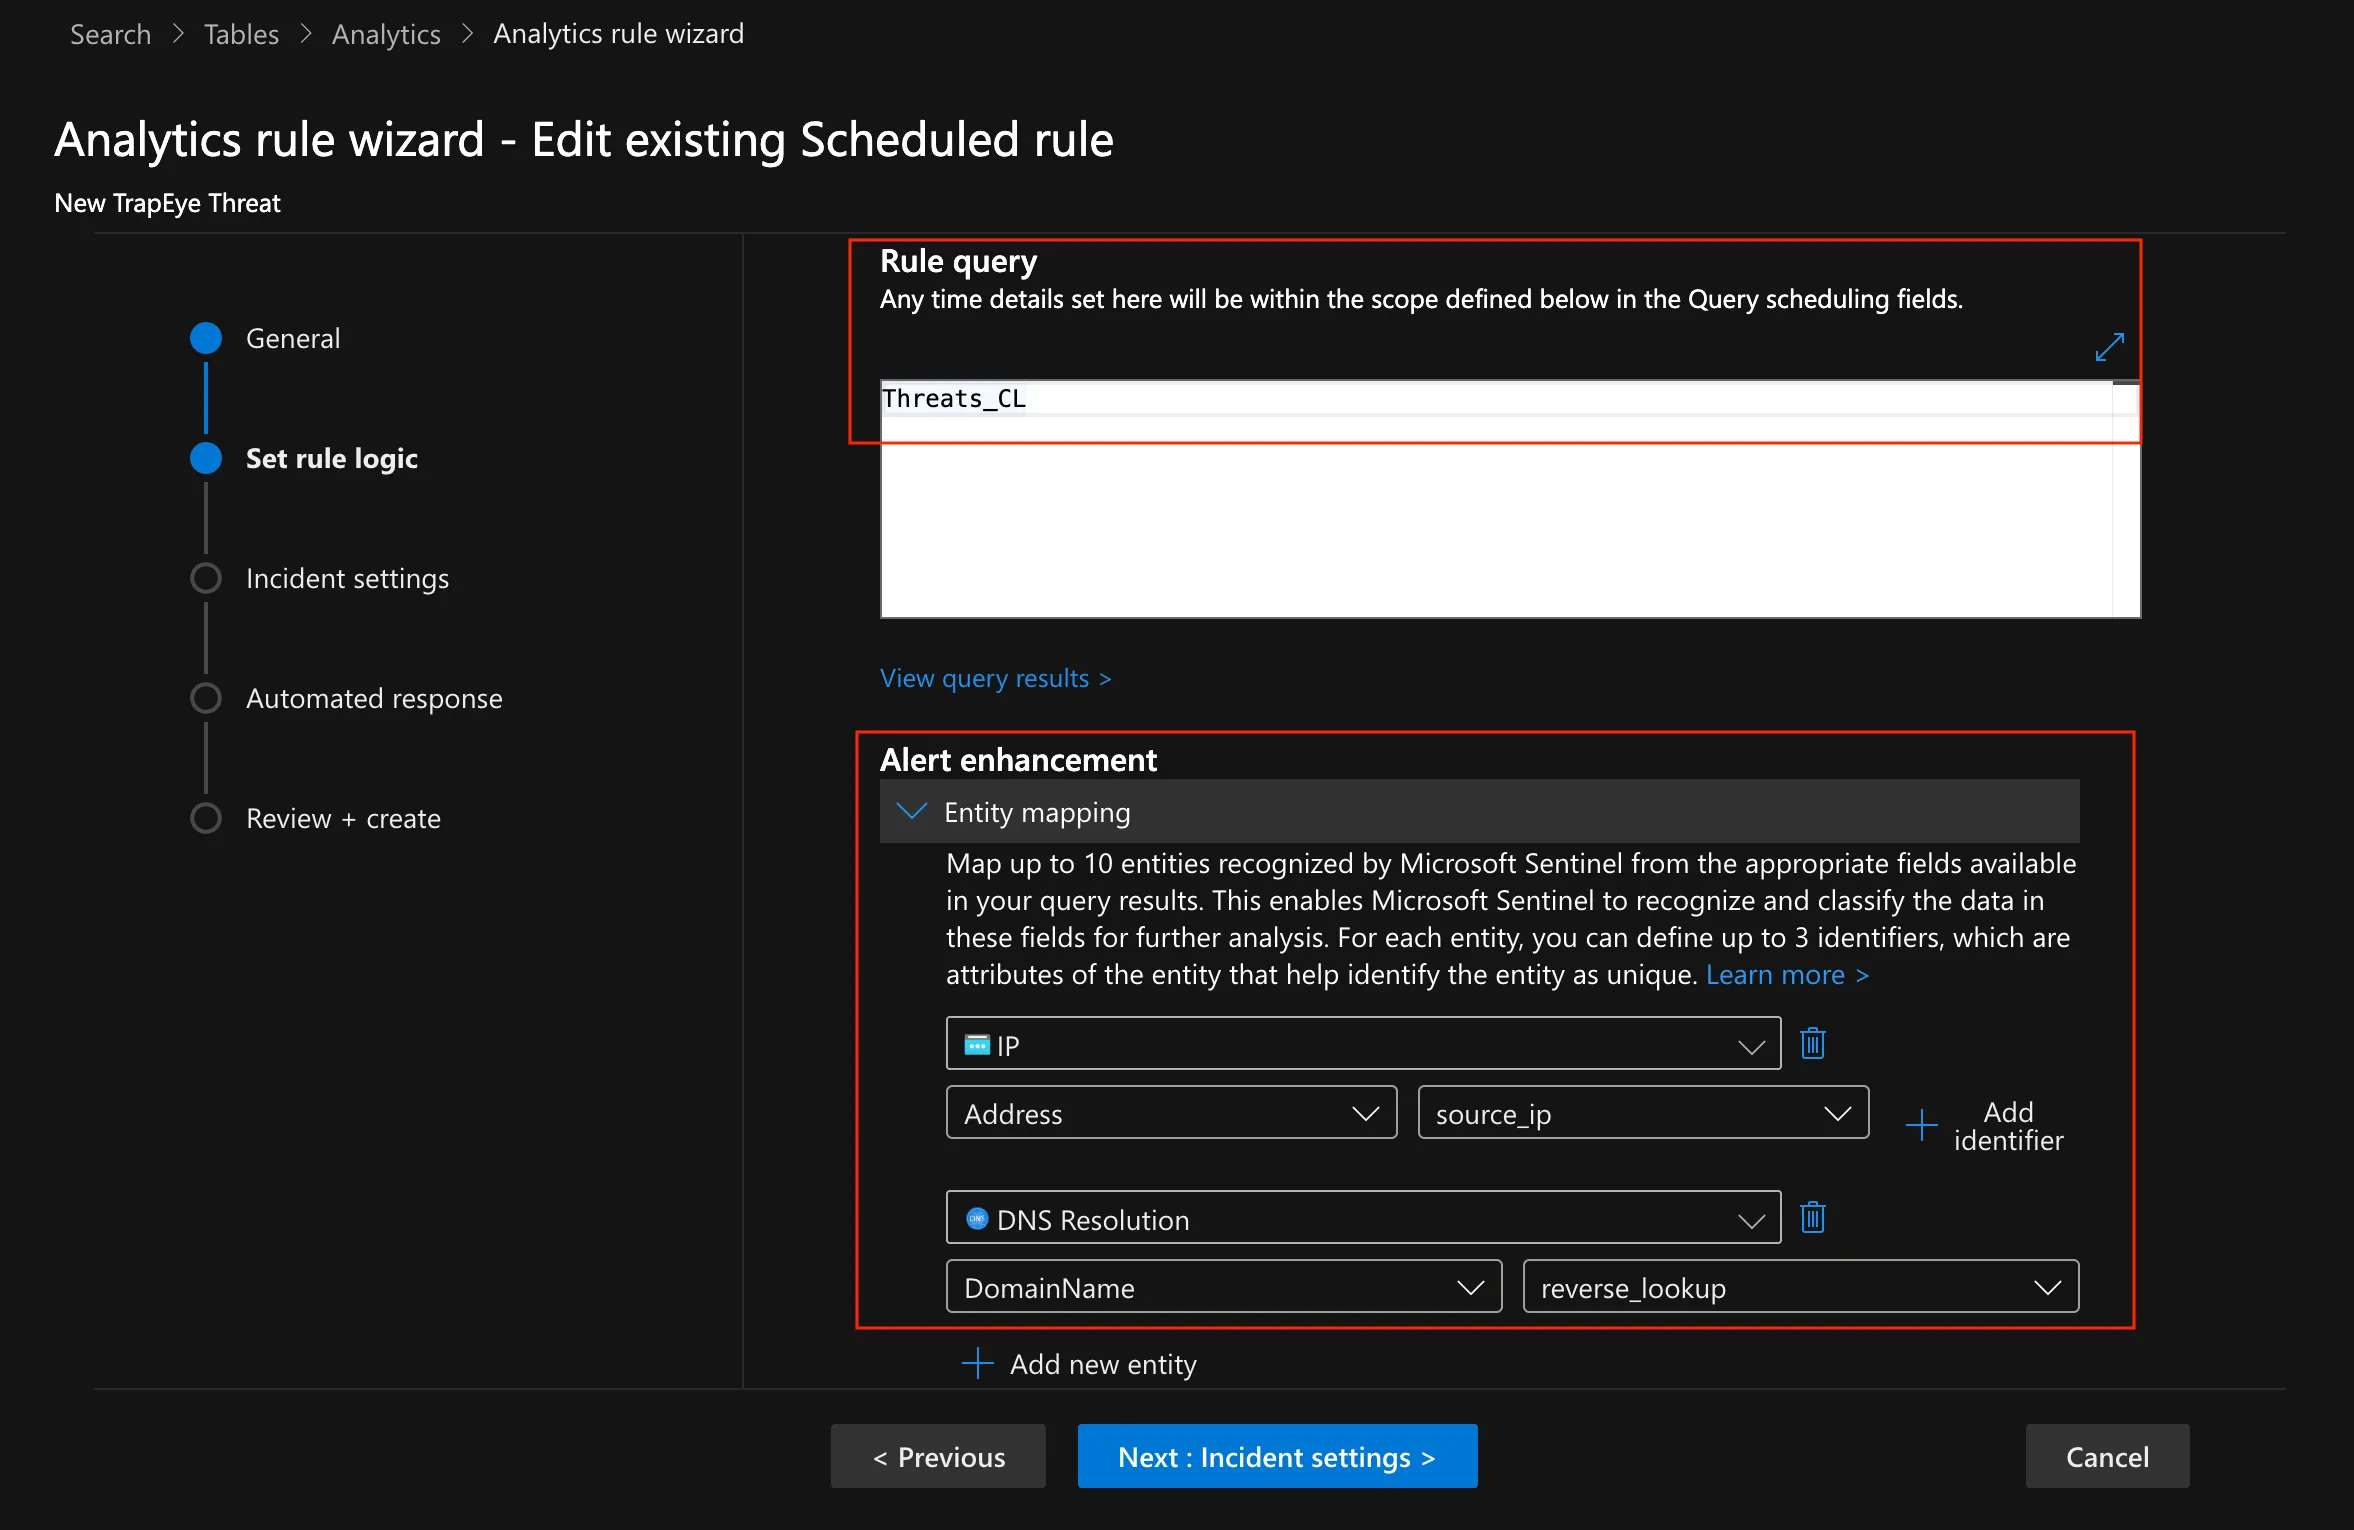
- Map the
In the Alert enhancement → Custom details section, create two key-value pairs:
- Key 1:
threat_uuid/ Value 1:threat_uuid - Key 2:
source_ip/ Value 2:source_ip

- Key 1:
In the Alert enhancement → Alert details section, enrich the alert with contextual data by populating the name and description fields using the Custom details defined in the previous step.
In the
Alert Name Formatfield:New TrapEye Threat from {{source_ip}}In the
Alert Description Formatfield:To investigate related interactions, run:YourInteractionsTableName_CL| where threat_uuid == '{{threat_uuid}}'| order by TimeGenerated desc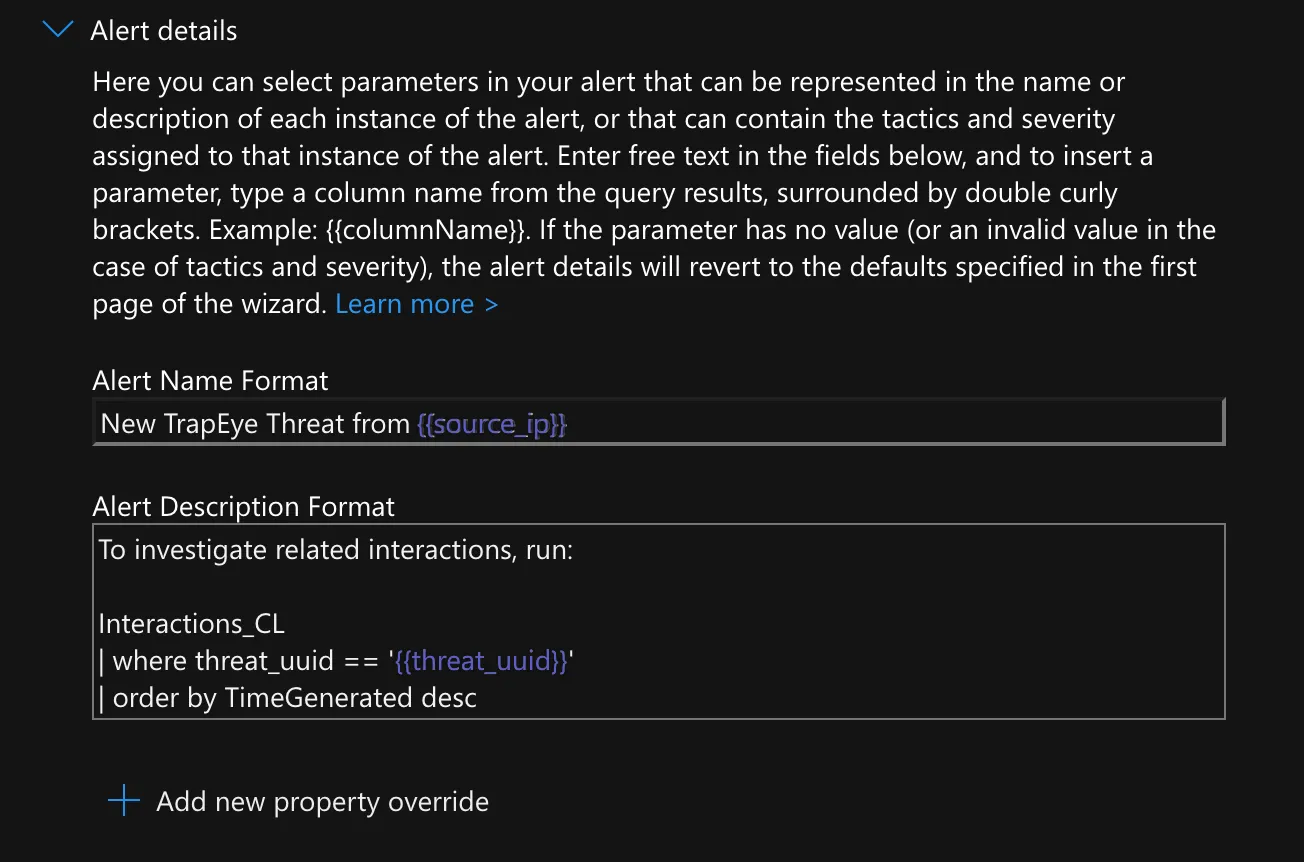
In the Query scheduling section, set the frequency and lookback period for the rule.
- Run query every:
5 minutes - Lookup data from the last:
5 minutes - Start running:
Automatically
- Run query every:
In the Event grouping section, select
Trigger an alert for each event.In the Incident settings section:
- Enable
Create incidents from alerts triggered by this analytics rule. - Disable Alert grouping.
- Enable
Optionally, assign an Automated response playbook to trigger remediation actions when an incident is created. Click Create to save the rule.
Setup Complete
Section titled “Setup Complete”TrapEye platform is now fully integrated with Microsoft Sentinel.